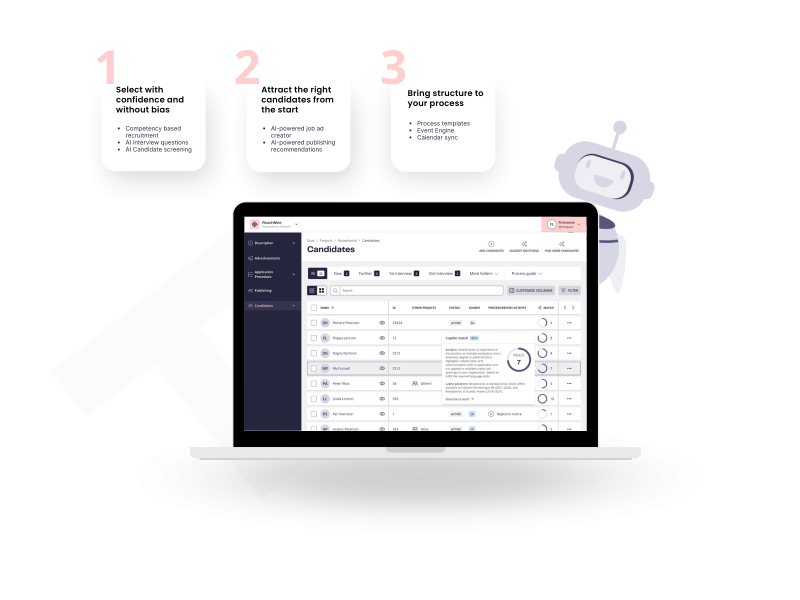
Streamline your recruitment process
Build a strong, automated recruitment foundation with the following features:
-
Process Templates.
-
Event Engine.
-
Calendar Sync.
How do these tools help you?
Set these tools up once, and enjoy a smoother recruitment process, consistent candidate experiences, and AI features tailored to your brand and preferences.
- Process Templates - Set the standard
Save time and ensure consistency by creating templates for job ads, emails, selection questions, and requirements. Standardized templates help you and your team to stay aligned and make every process smoother. - Event Engine - Automate steps with simple rules
Automate steps in the candidate selection view with simple rules: move qualified candidates, trigger work test emails, or send timely, polite rejections automatically and more actions to tailor your workflow. - Calendar Sync - schedule interviews easily
Sync your calendars to schedule interviews easily, avoid double bookings, and let the system suggest the best time slots for everyone.
How it works:
Recruitment Templates
- Job ad templates – for consistent job ads with the right tone and structure.
- Selection questions – to quickly ask candidates the same questions.
- Requirement profiles – to clearly define competencies and requirements right from the start.
- Create the base templates you want to use (ads, questions, requirement profiles, etc.) under the Admin menu tab.
- Customize and combine the templates into a recruitment template that reflects your process.
- Save and reuse the template for future recruitments as described below.
- When starting a new recruitment project, select the desired recruitment template.
- With one click, the entire project is created based on your templates – complete with ad, selection questions, and requirement profile.
- If needed, you can adjust the details before publishing.
- Time saving – start projects faster.
- Quality assurance – consistent processes and ads.
- Simplicity – everything prepared in one place.
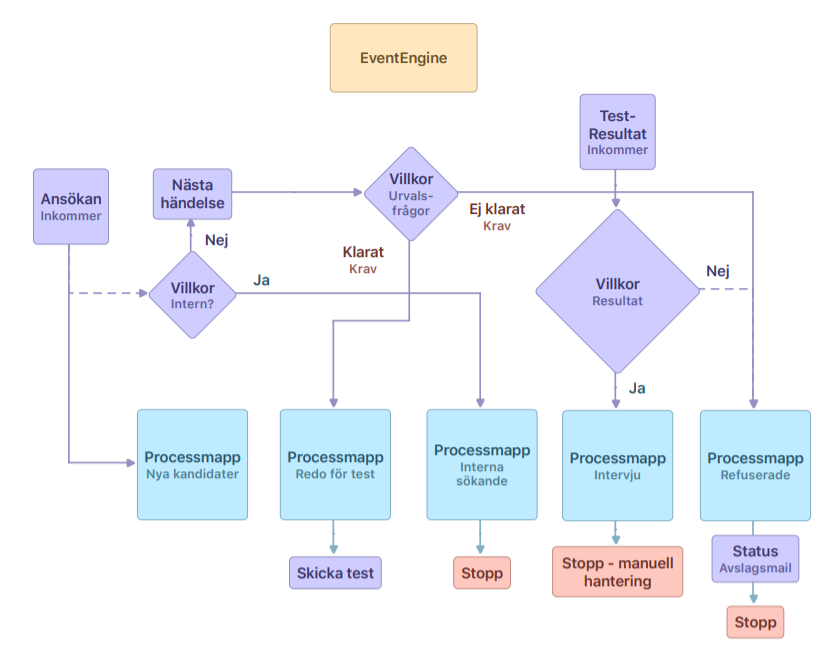
Event Engine
The Event Engine is a smart tool that helps you automate one or several steps in your recruitment process. For example, you can set up rules to avoid manually handling candidates who don’t meet the basic requirements for a project.
The easiest way is to create a template for what you want the Event Engine to do, as it’s useful to have a well-planned process in place (a tip is to sketch a flowchart of how you want it to work).
If there’s a ready-made template available, simply select it from the list on the right and click "Apply template". Then you’re done, and the Event Engine will run as planned.
When setting up an Event Engine, there are a few things to consider.
Which event should the engine react to?
The Event Engine always starts by reacting to an event in the system. At the moment, it can respond to five types of events:
- Job application submitted (Triggered when a candidate’s application enters the system)
- Job application updated (Triggered when a candidate updates their application)
- Moved to a folder (Triggered when a candidate is moved to a specific folder you select)
- Moved from a folder (Triggered when a candidate is moved out of a specific folder you select)
- Candidate test completed (Triggered when a test is finished)
Which rules apply to the event?
After selecting an event, you then set the rules that apply to it.
You can name the rule anything that makes sense, for example, "Does not meet basic requirements".
You can also choose what happens after the actions have been carried out.
Either choose "Continue with subsequent rules", which will continue to check if the event matches the next rule, or "Skip subsequent rules and go directly to 'Always do this'". This can be useful, for example, if candidates must have a specific driver’s license. If they indicate they don’t have it, the engine doesn’t need to check other criteria and can go straight to the "Always do this" step.
There are also two options for handling actions within each rule:
"Allow the Event Engine to treat the action as a new event" and "Prevent the Event Engine from treating the action as a new event".
If you allow it, the engine can continue reacting if, for example, a candidate is moved into a new folder based on the action you set. If you prevent it, the engine will complete the current rule but stop there, requiring manual handling if the candidate moves to another folder with Event Engine rules attached.
After naming the rule, you choose which conditions must be met for the actions to trigger. For example, you can set conditions based on candidate responses to screening questions.
Next, you define the Actions.
Here, you decide what should happen when the conditions are met. You can select multiple actions (for example, move a candidate to a new folder and send them an email).
The available actions include:
- Move candidate to folder (Moves the candidate to a specified folder)
- Send email (Sends an email to the candidate. You can select a pre-made template or write a custom message. You can also add a delay if you don’t want the email to be sent immediately.)
- Add tags (If you use tags on candidates, you can specify which tags to add)
- Set status (Sets the candidate’s status, such as Active, Rejected but of future interest, or Declined)
- Send test invitation (Sends out a test based on your integration settings)
- Assign task to user (Sends a task to a specific user in your team, or an external consultant helping you)
Do this when no rules match
Depending on how you build your Event Engine, you can also set actions to run when no earlier rules are triggered.
Always do this
Here, you can add an action that always runs whenever the event is triggered. For example, you might always want to send an email asking candidates to submit an expression of interest.
Good to keep in mind
If you’re using several tests, it’s a good idea to add a condition requiring at least 1 point on all tests that generate scores. This prevents candidates from being rejected after failing the first test while subsequent tests haven’t yet been completed.
Short description
The Interview Scheduler is a new feature that syncs customers calendars with ReachMee, making it easier to schedule, manage, and conduct interviews.
It offers smart time suggestions and enables online meetings with various platforms.
This simplifies the interview process for both recruiters and candidates.
How does it work?
To get the best experience, users must sync their calendars. This is to get suggested timeslots, auto adding/removal of interviews, view availability on other users and use online tools.
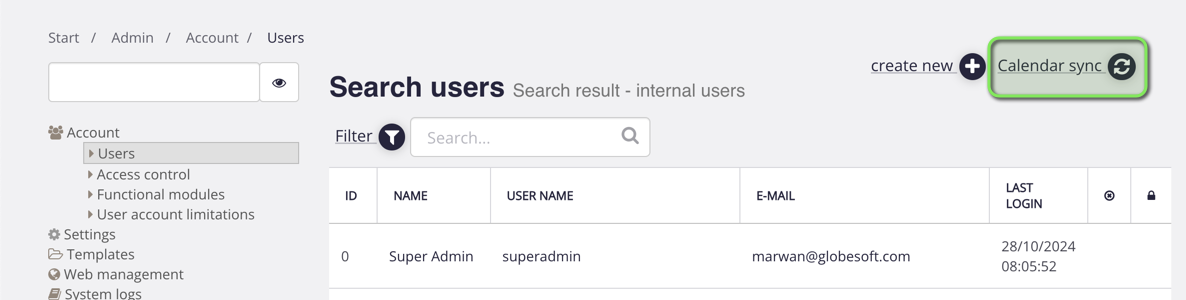
Sync users
First step is to invite users to sync their calendars.
Go to Admin, click on Account and Users. Here you will see the option “Calendar sync”:
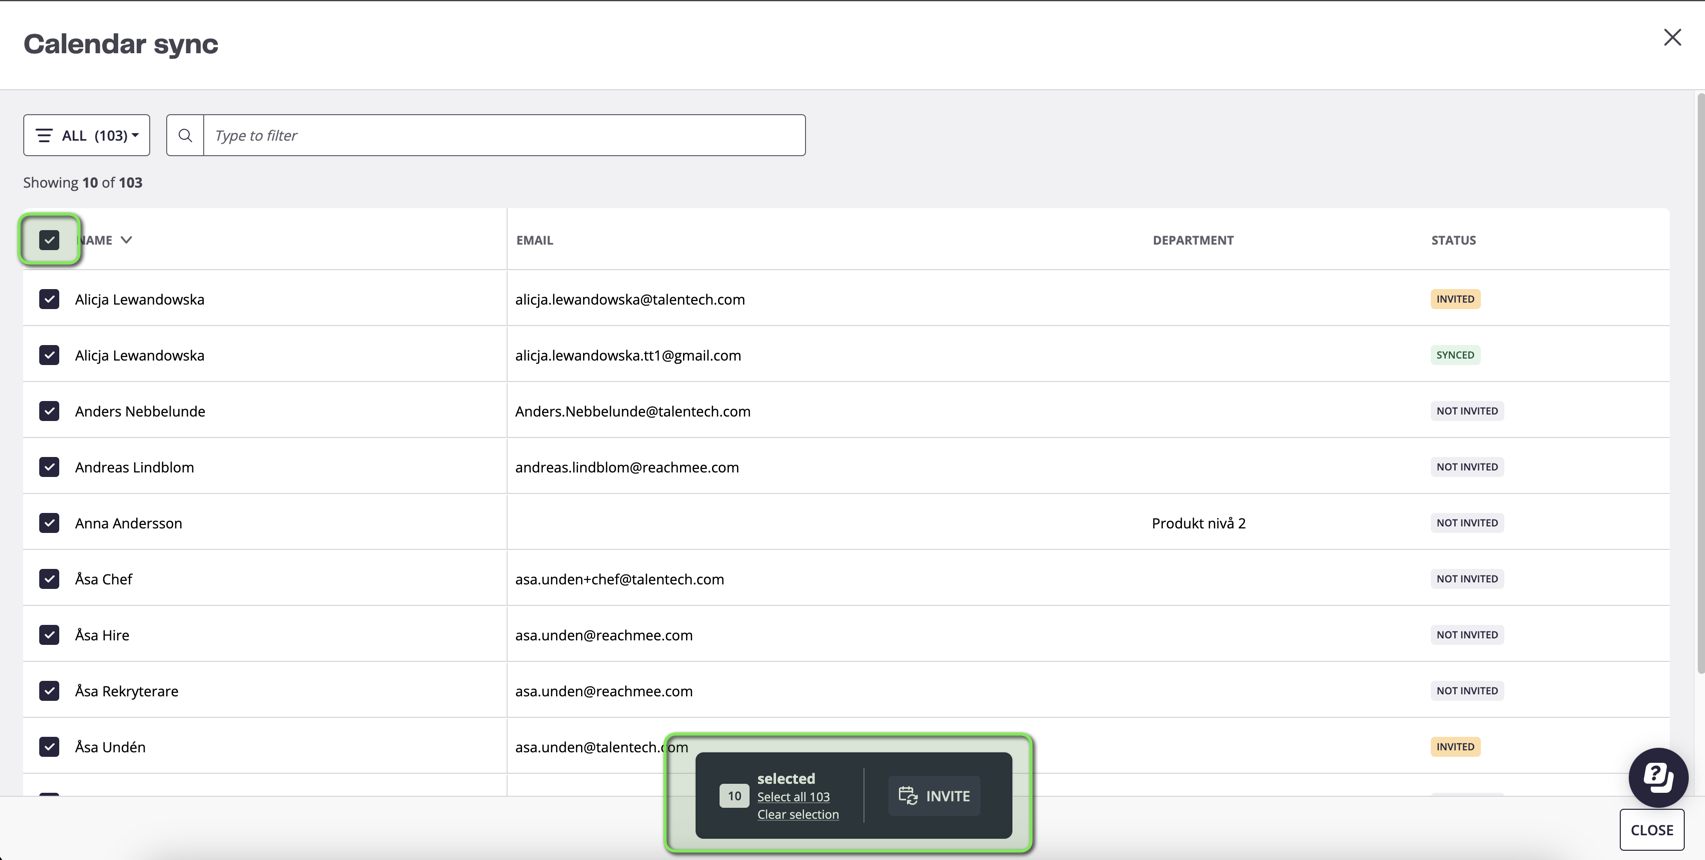
When you click on Calendar sync, you will get a new list of users, where you can invite, view status on sync and filter on status if more invites are needed:
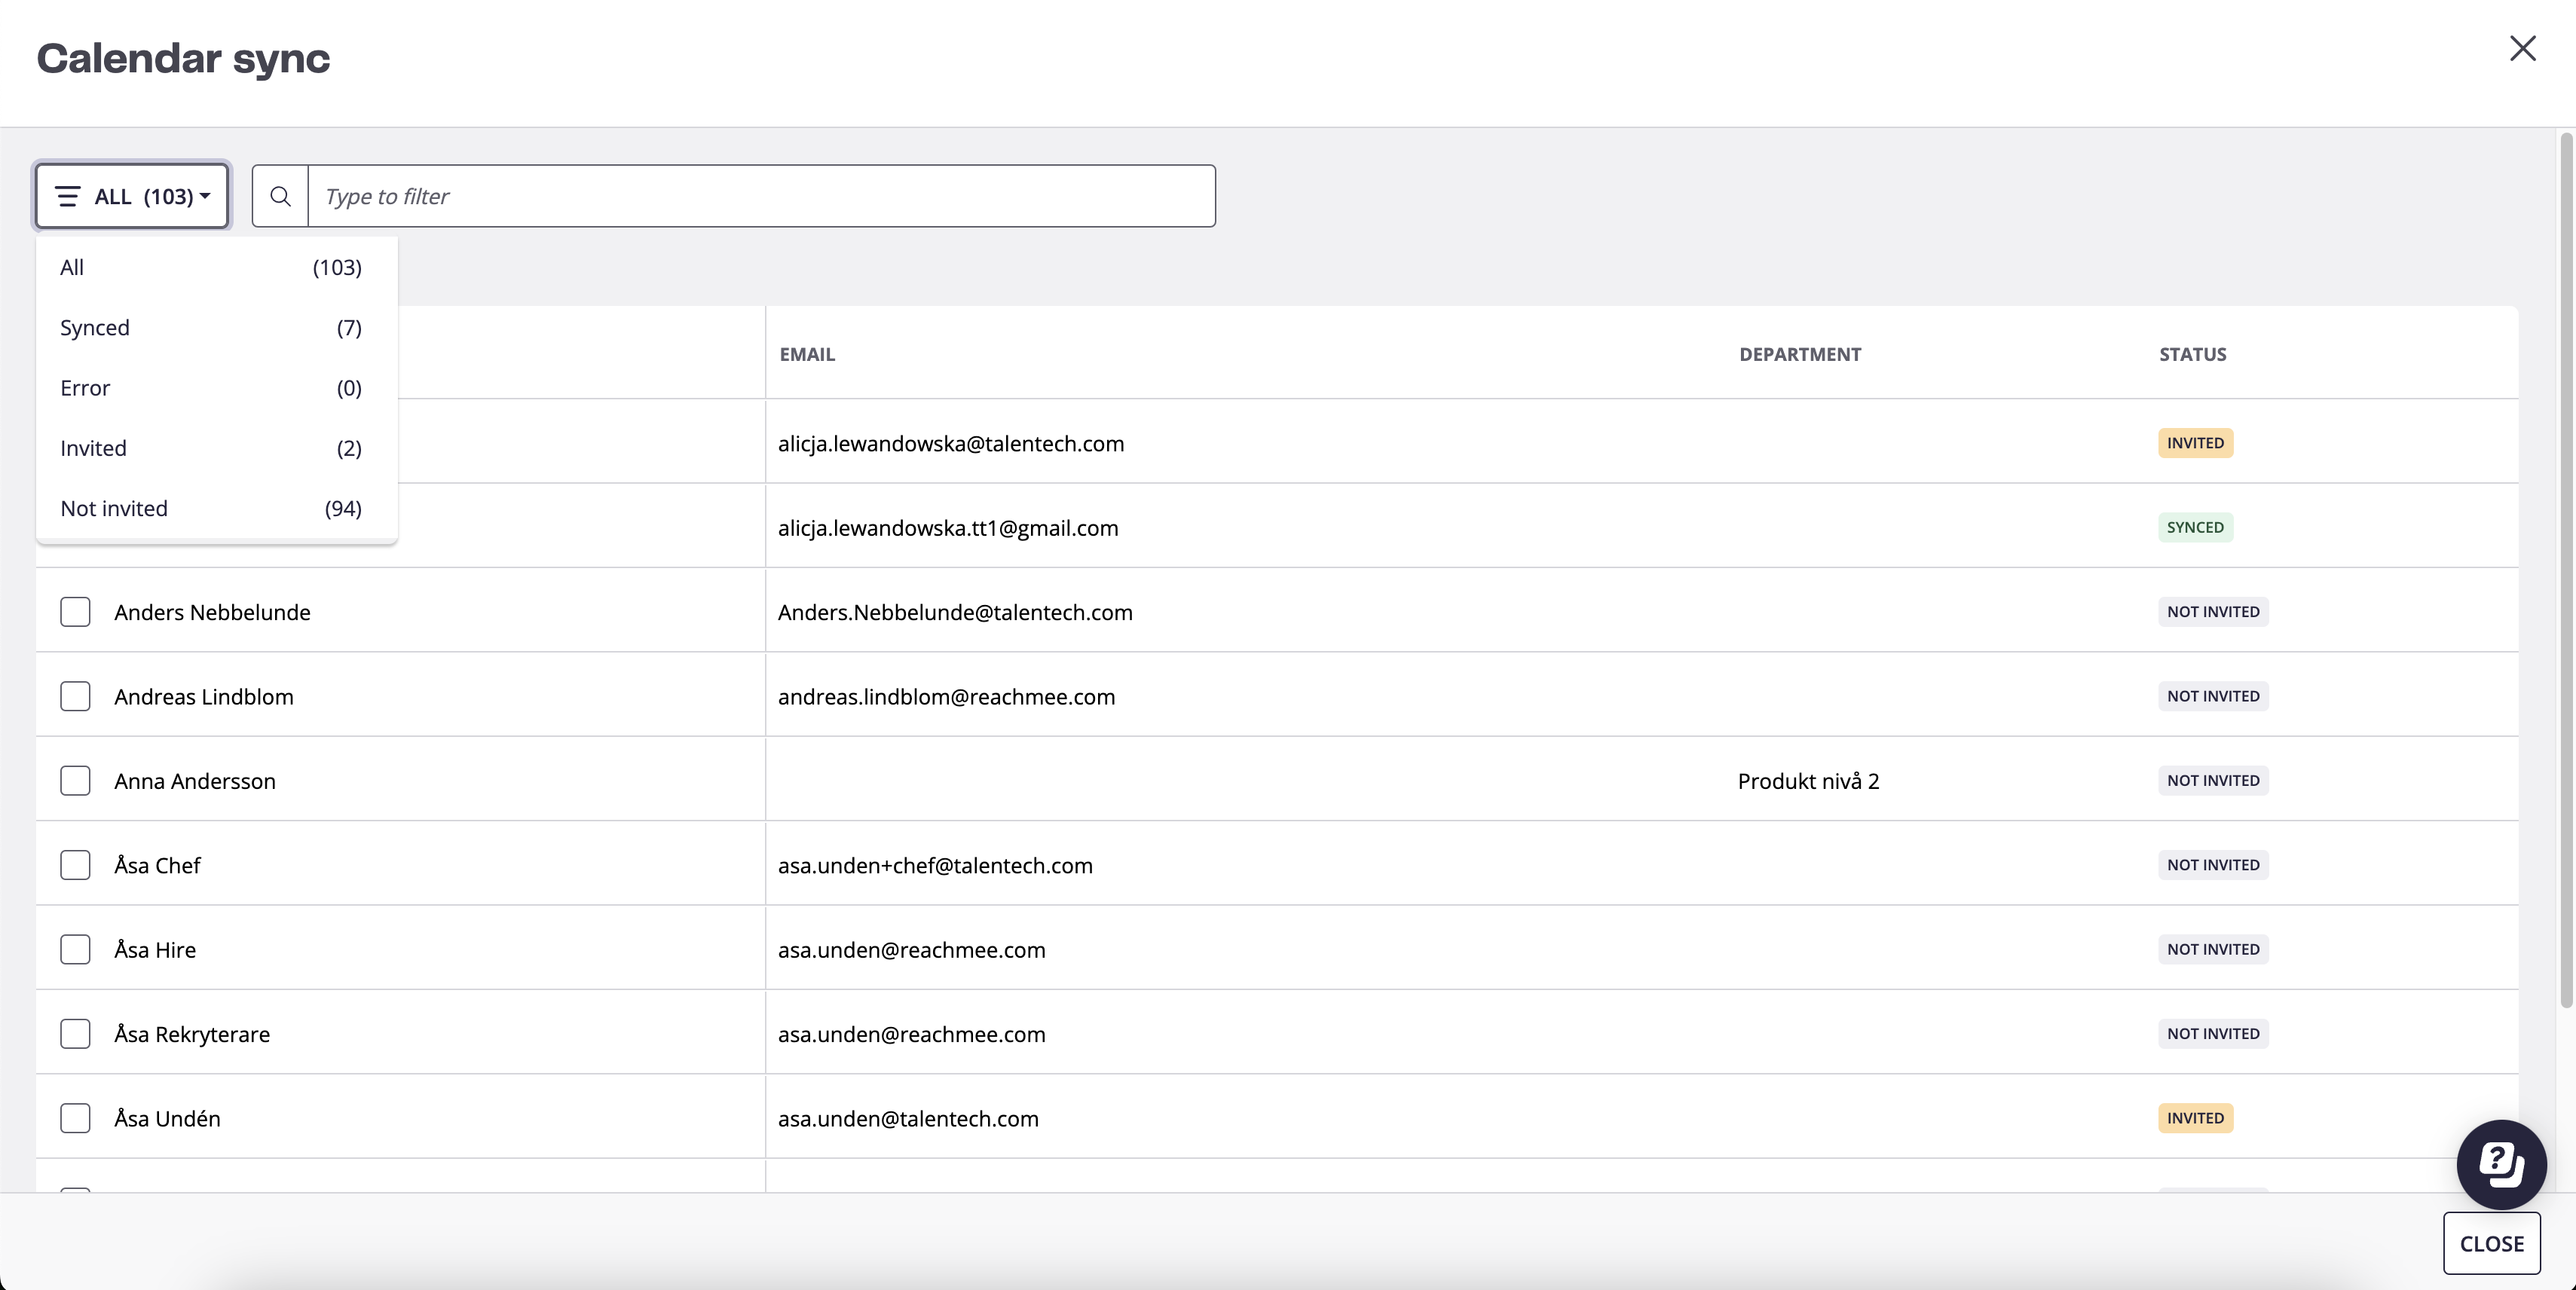
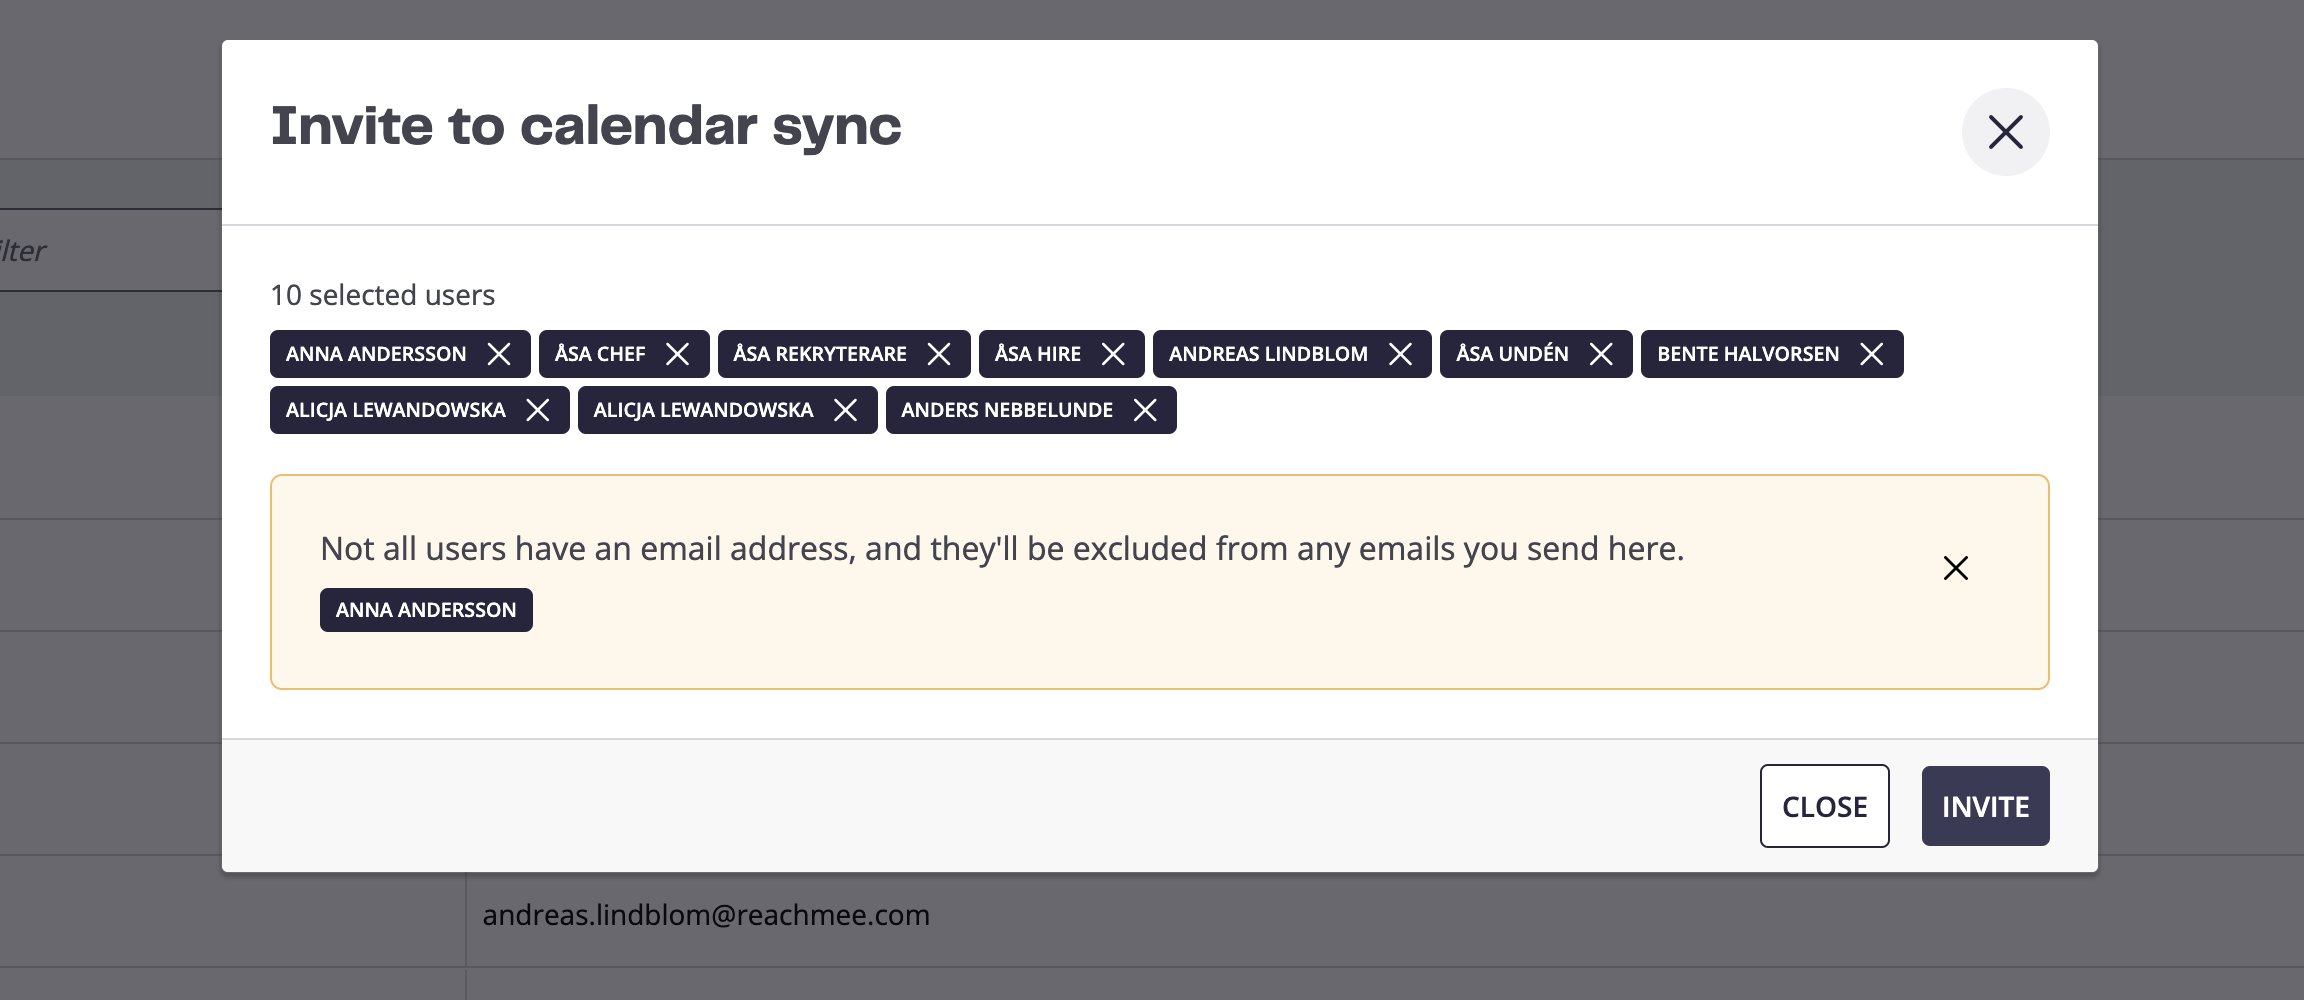
You can easily select all and send the invite:
If some of your selected users don’t have an email, we will show this to the user:
Send interview invitations
Now that the users are synced, we are ready to start inviting candidates.
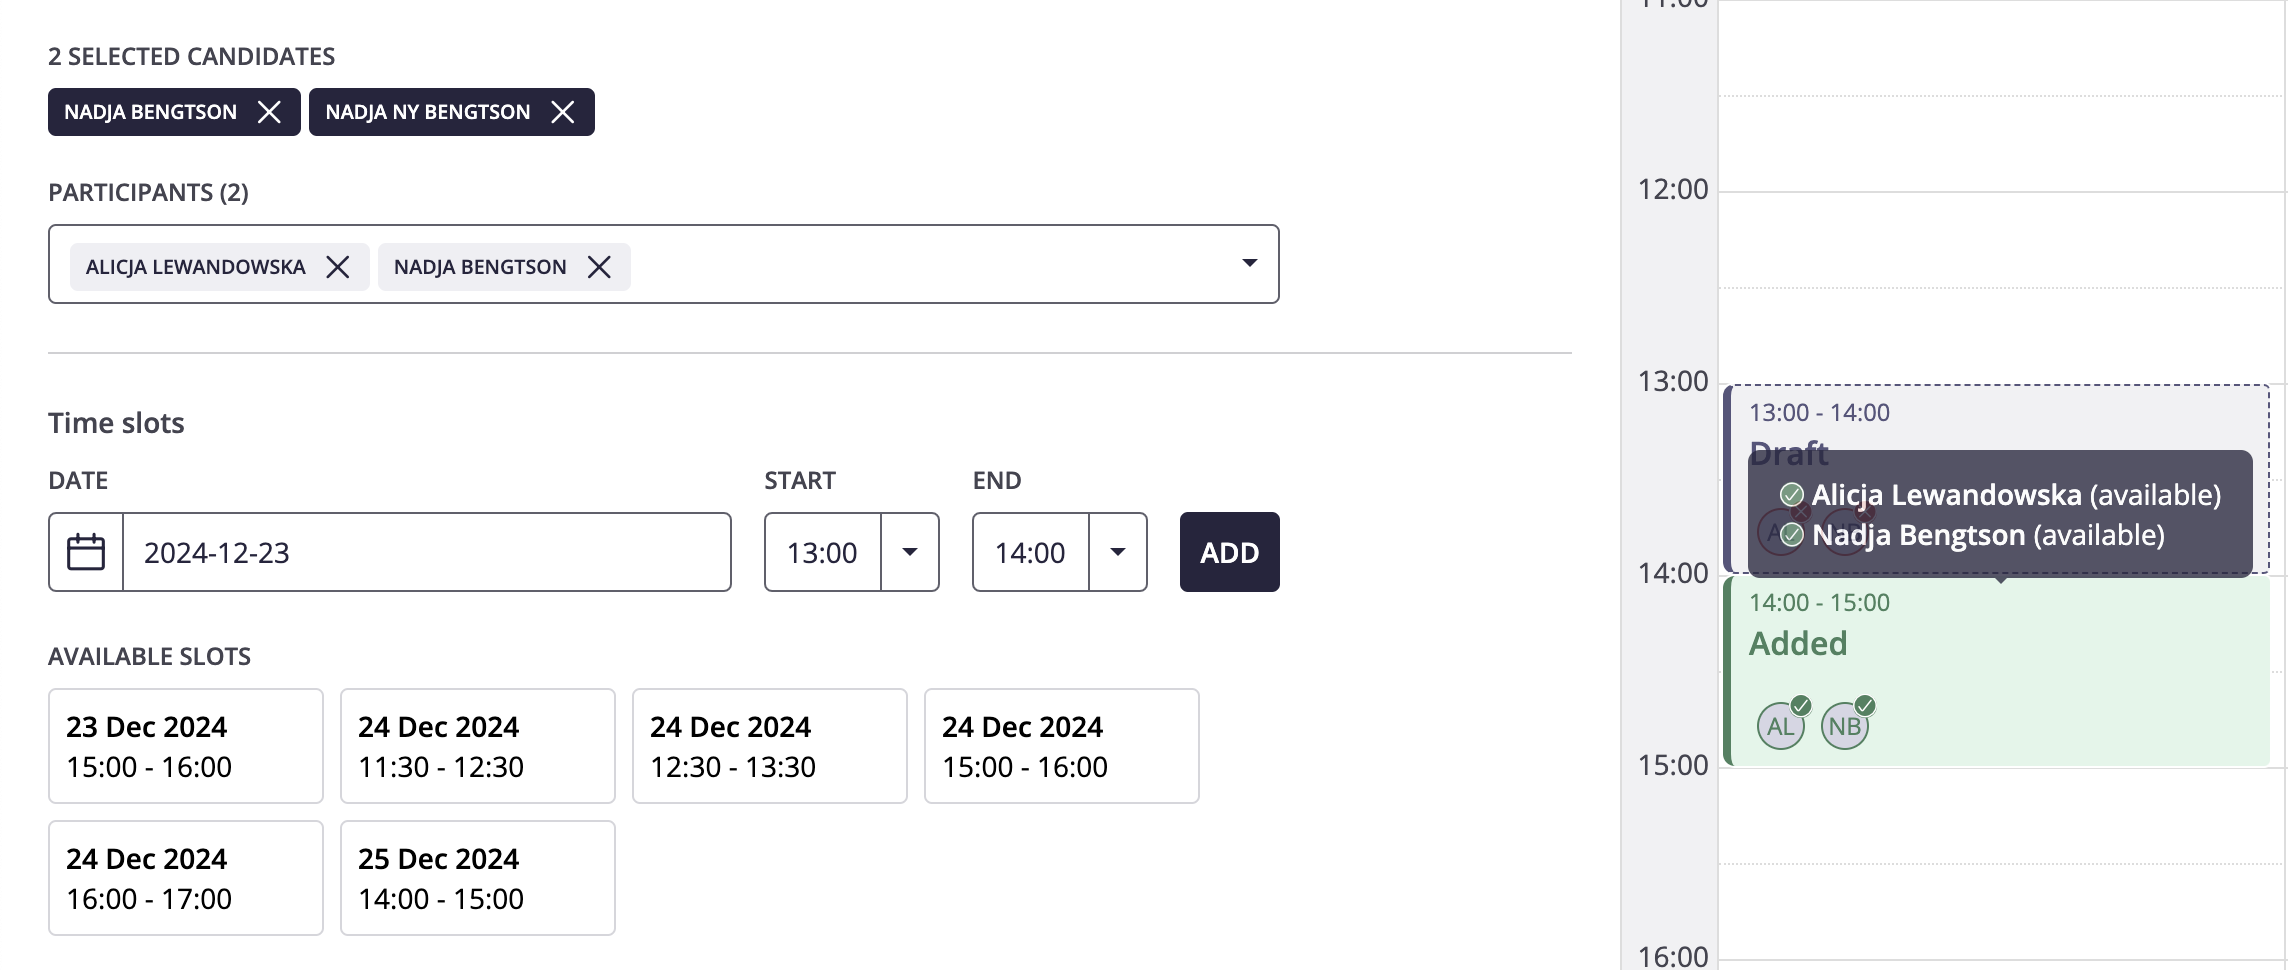
On the candidate list, you can select one or more candidates:

You will now start to create your interview:
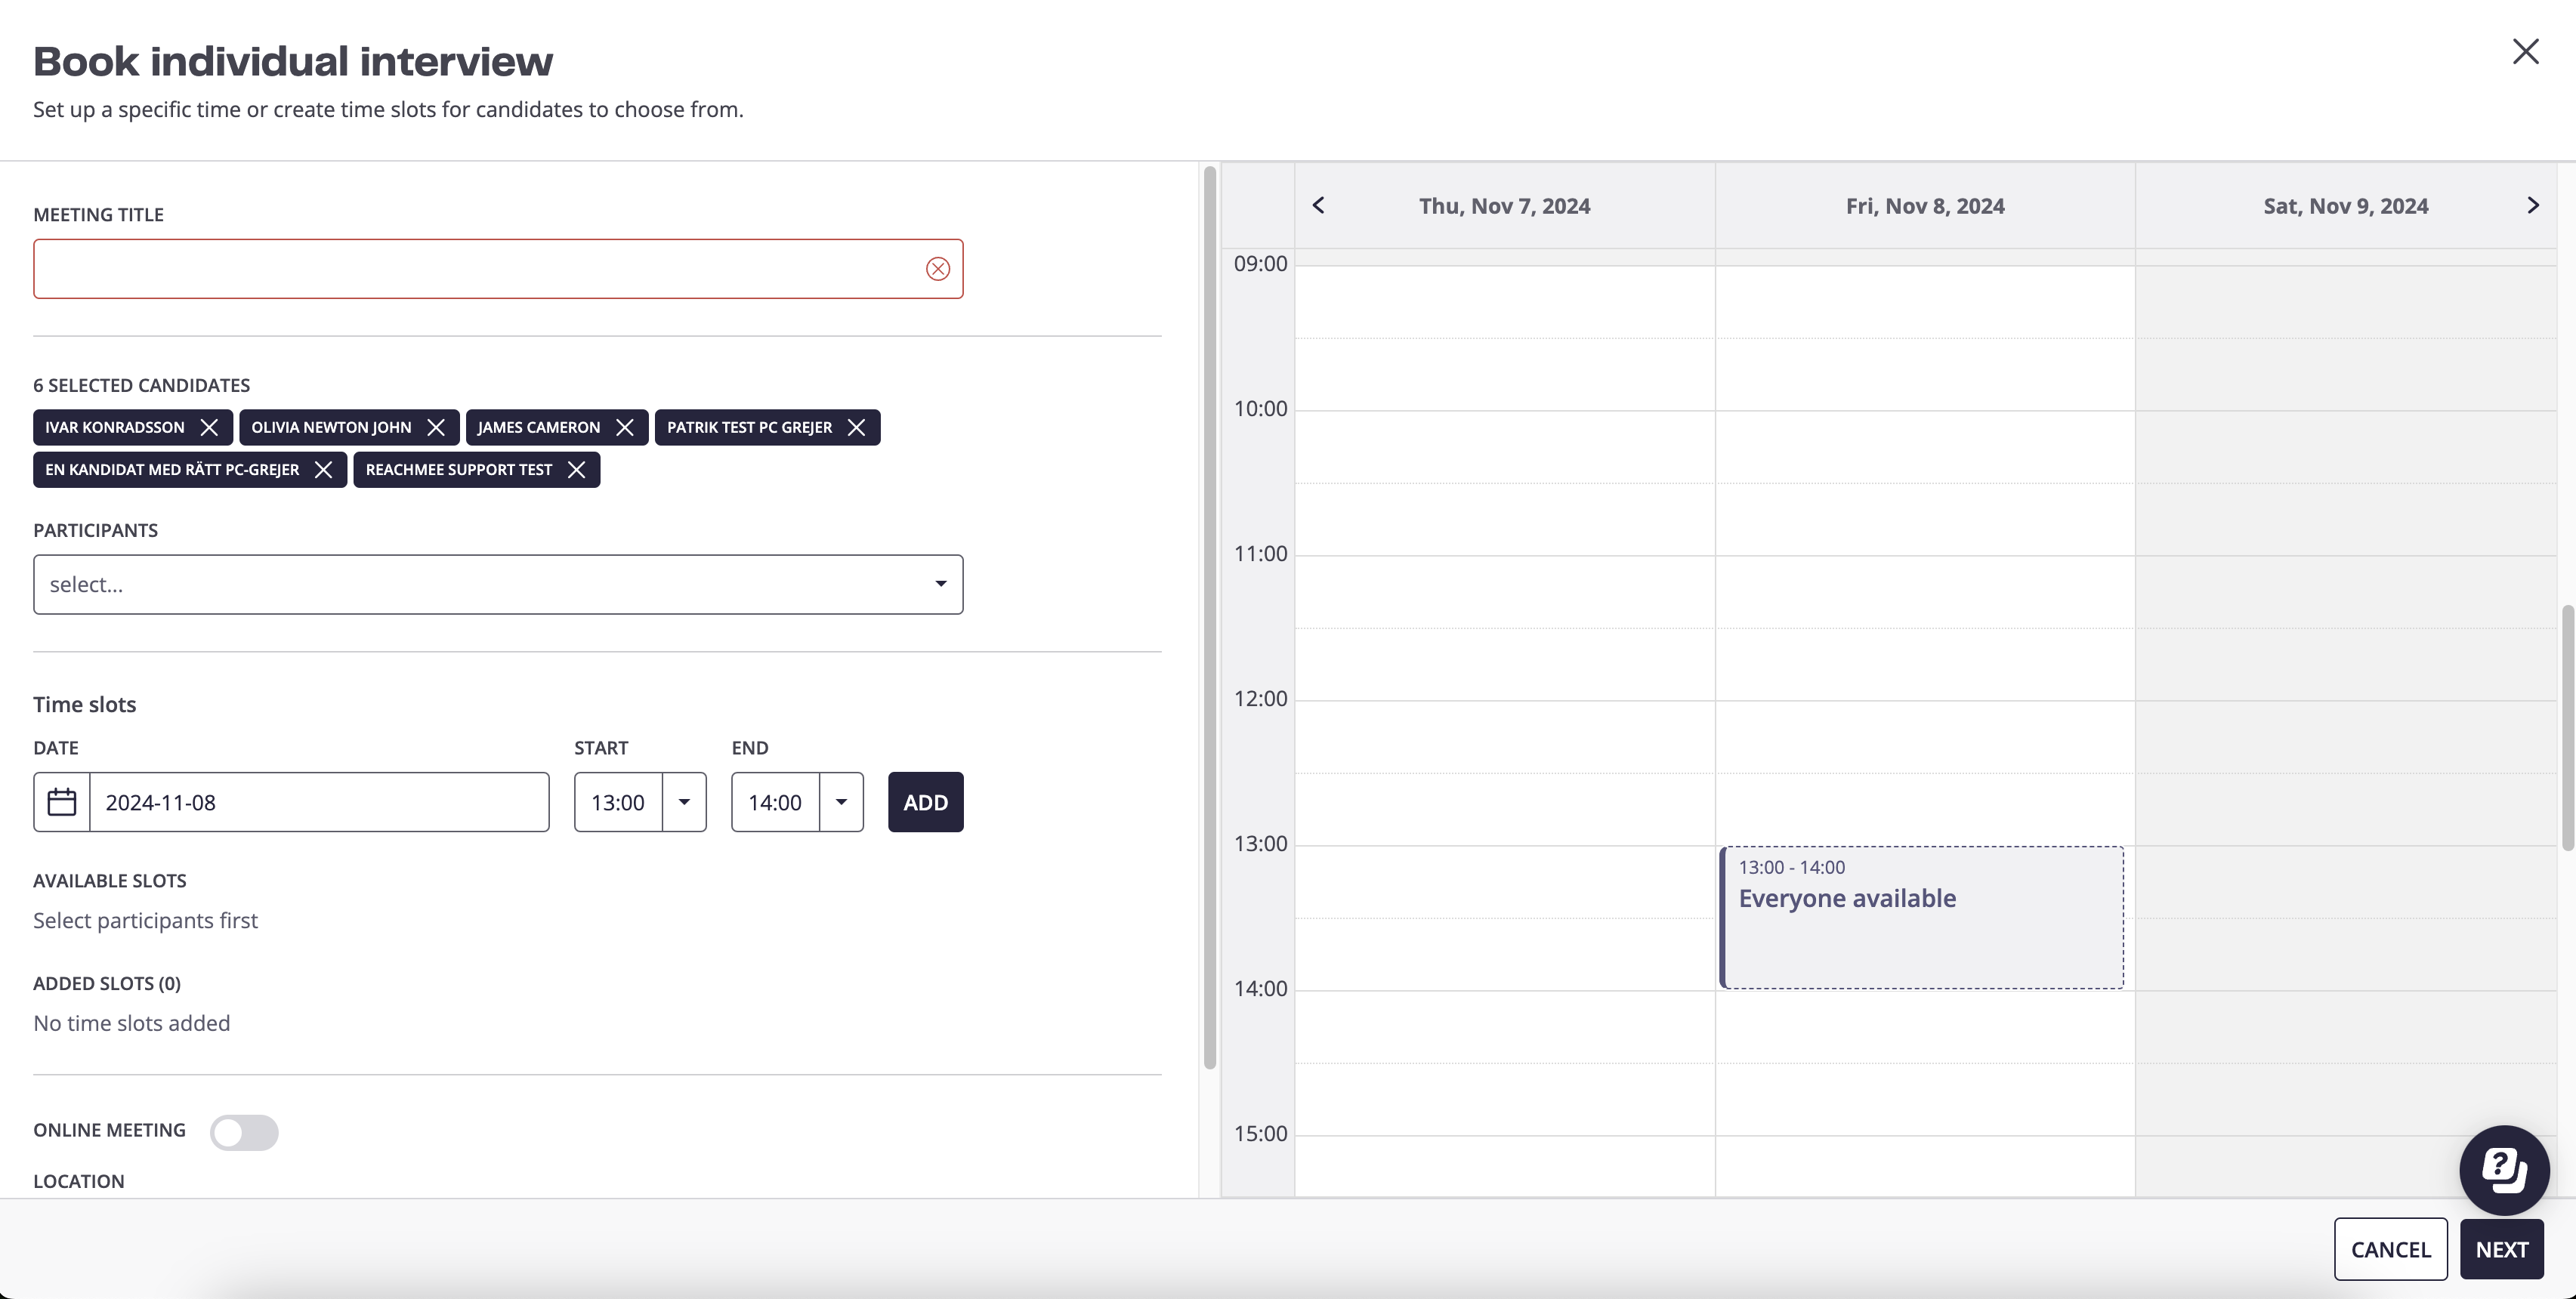
When you select participants who has synced their calendars, you will get suggested timeslots and be able to view if they are available:
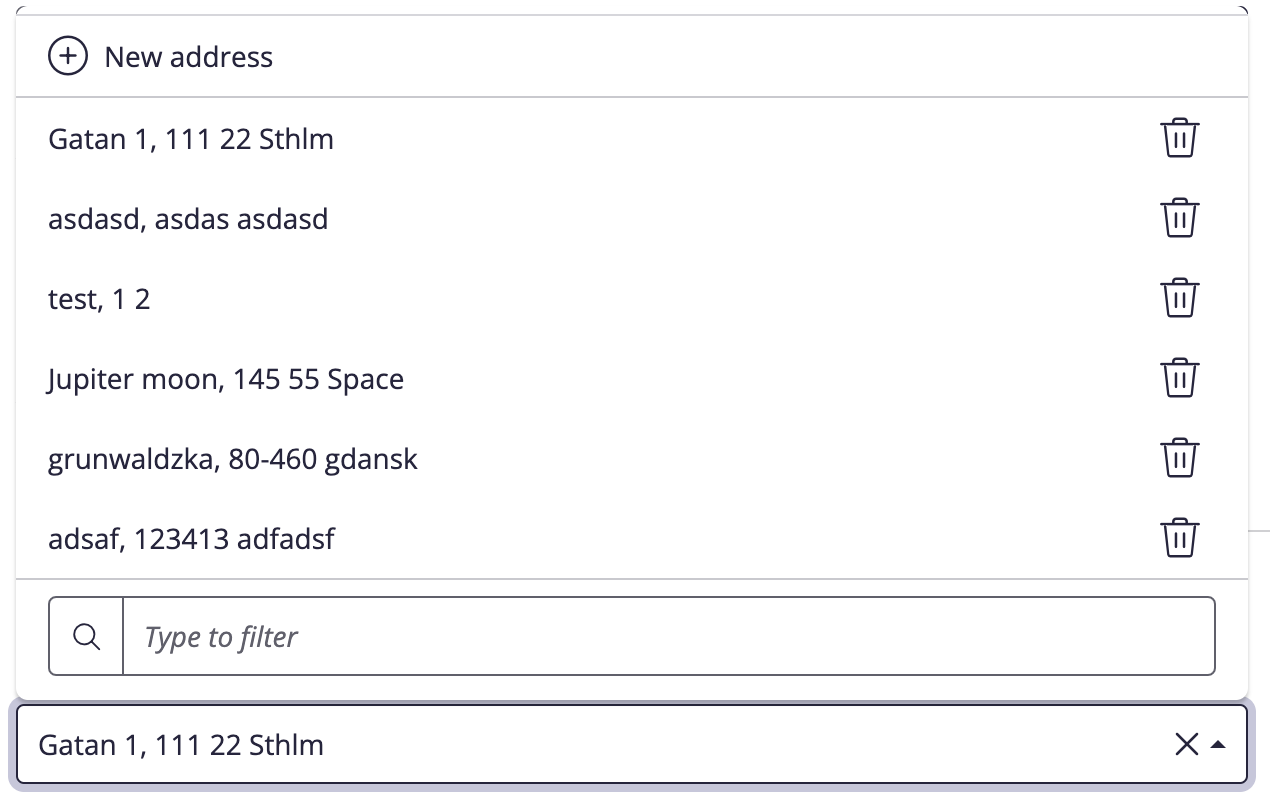
When choosing where to meet, you can decide on a location or online meeting:
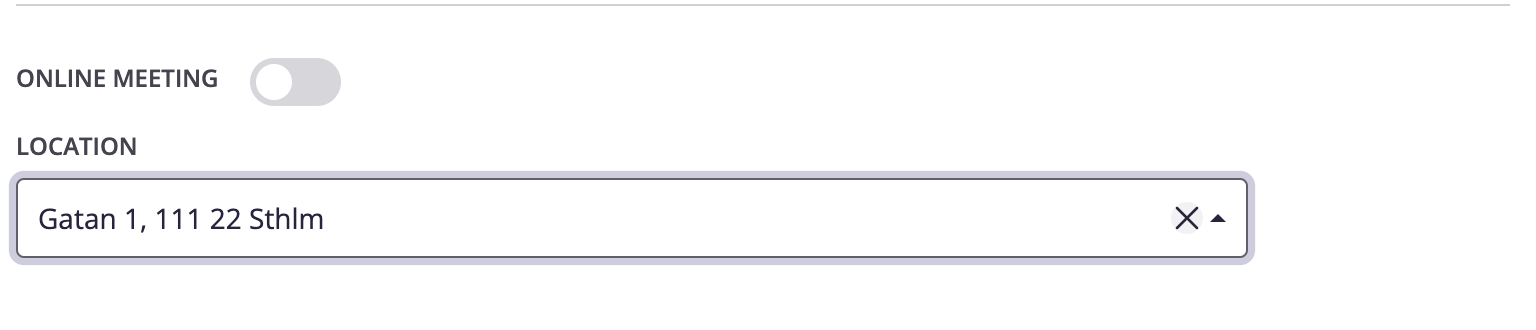
Locations can be managed direclty in the invites by all users, so they can select/add/remove as they like:
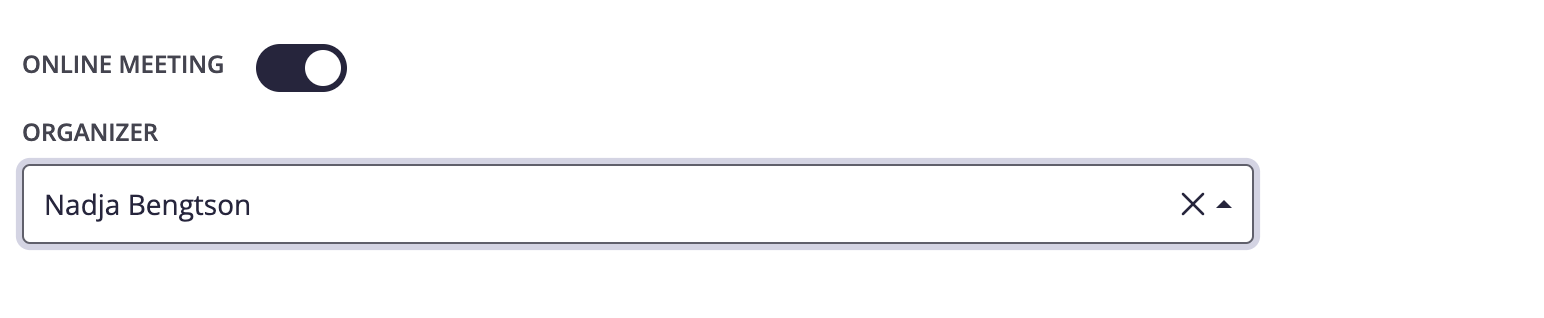
They can also choose to have an online meeting, but then the organizer has to have synced their calendar so that you can choose it:
When these selections have been added the next step is to send the email:

User experience
Synced users:
- Will be notified about booked meetings
- Will be notified about cancelled meetings
- Will automatically have booked meetings and removal of meetings
- Will have the possibility to be organizer on online meetings
Non-synced users:
- Will be notified about booked meetings
- Will be notified about cancelled meetings
- Will receive a calendar appointment to add and manually remove when cancelled
- Cannot be organizers on online meetings
Candidate experience
The invited candidates now receives an email with a link to slect a timeslot.
Here they can select or give feedback that there’s no suitable timeslots:
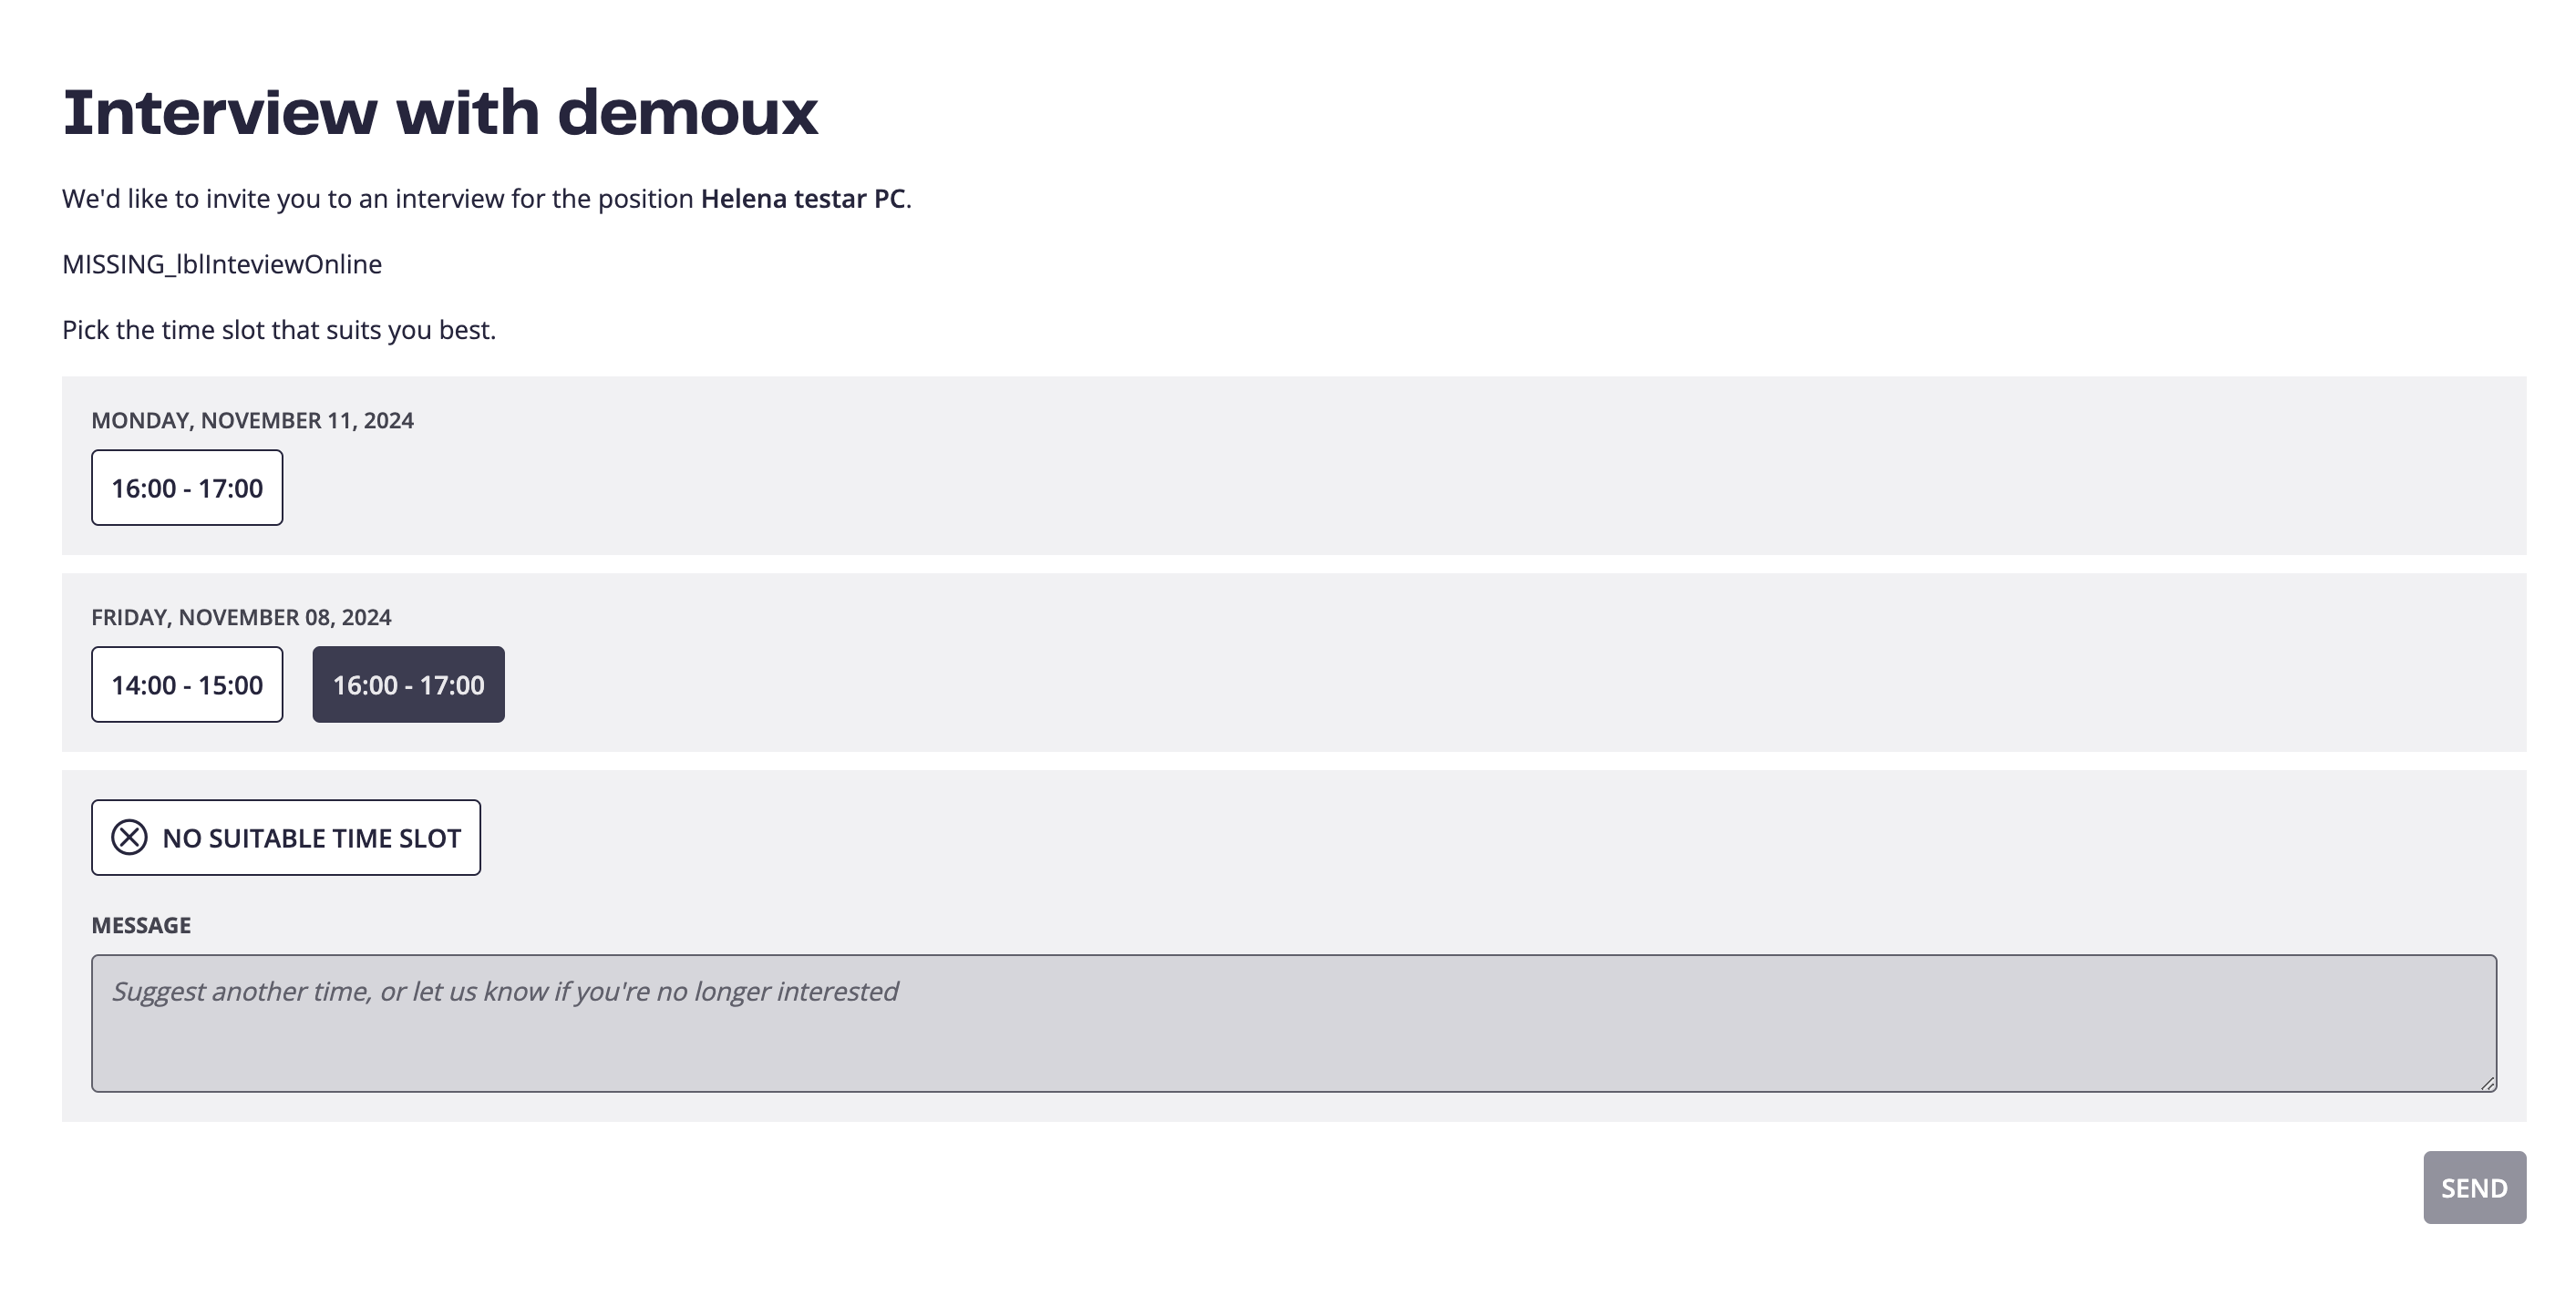
If no suitable timeslots, the candidate can add a comment that users can view inside ReachMee:

When selecting a timeslot, the candidate get a confirmation and option to add to their calendar:
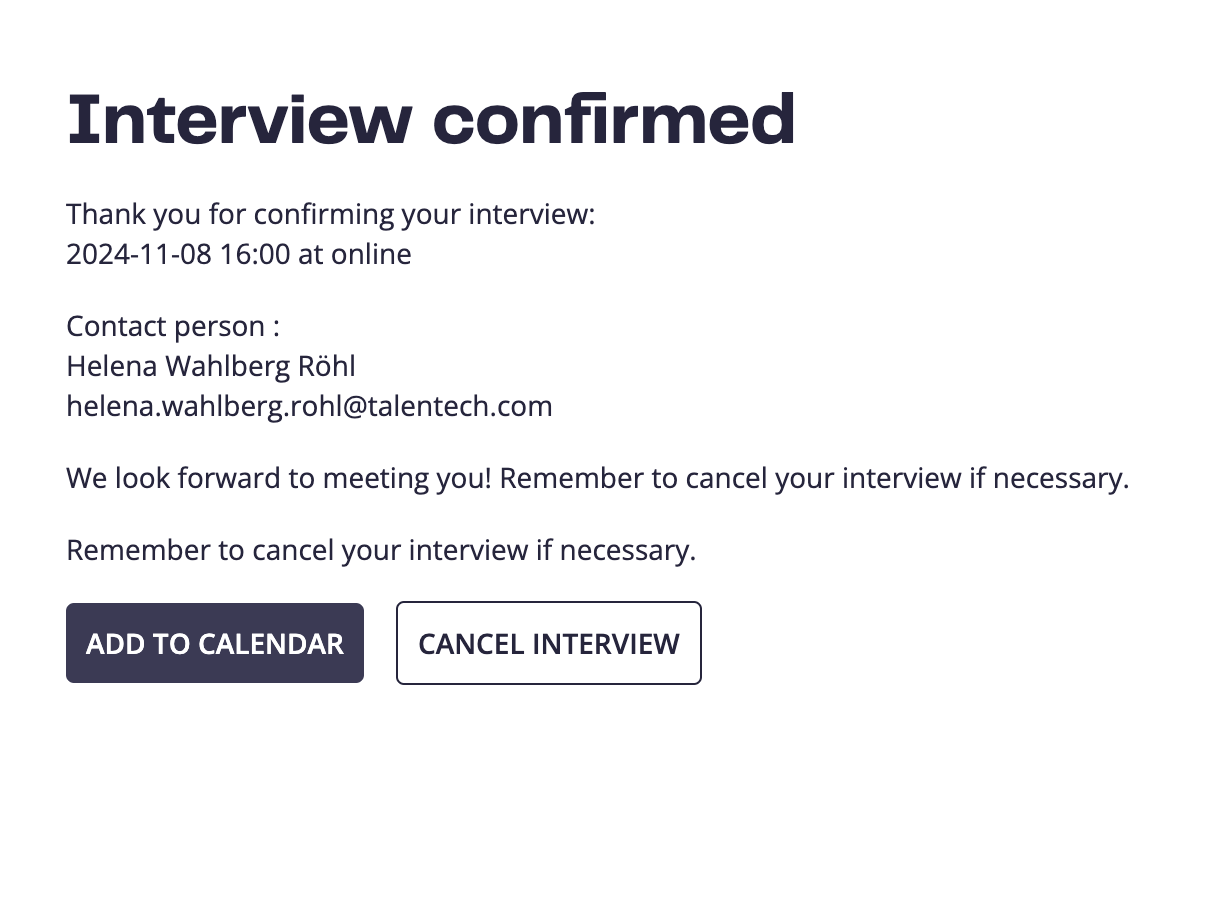
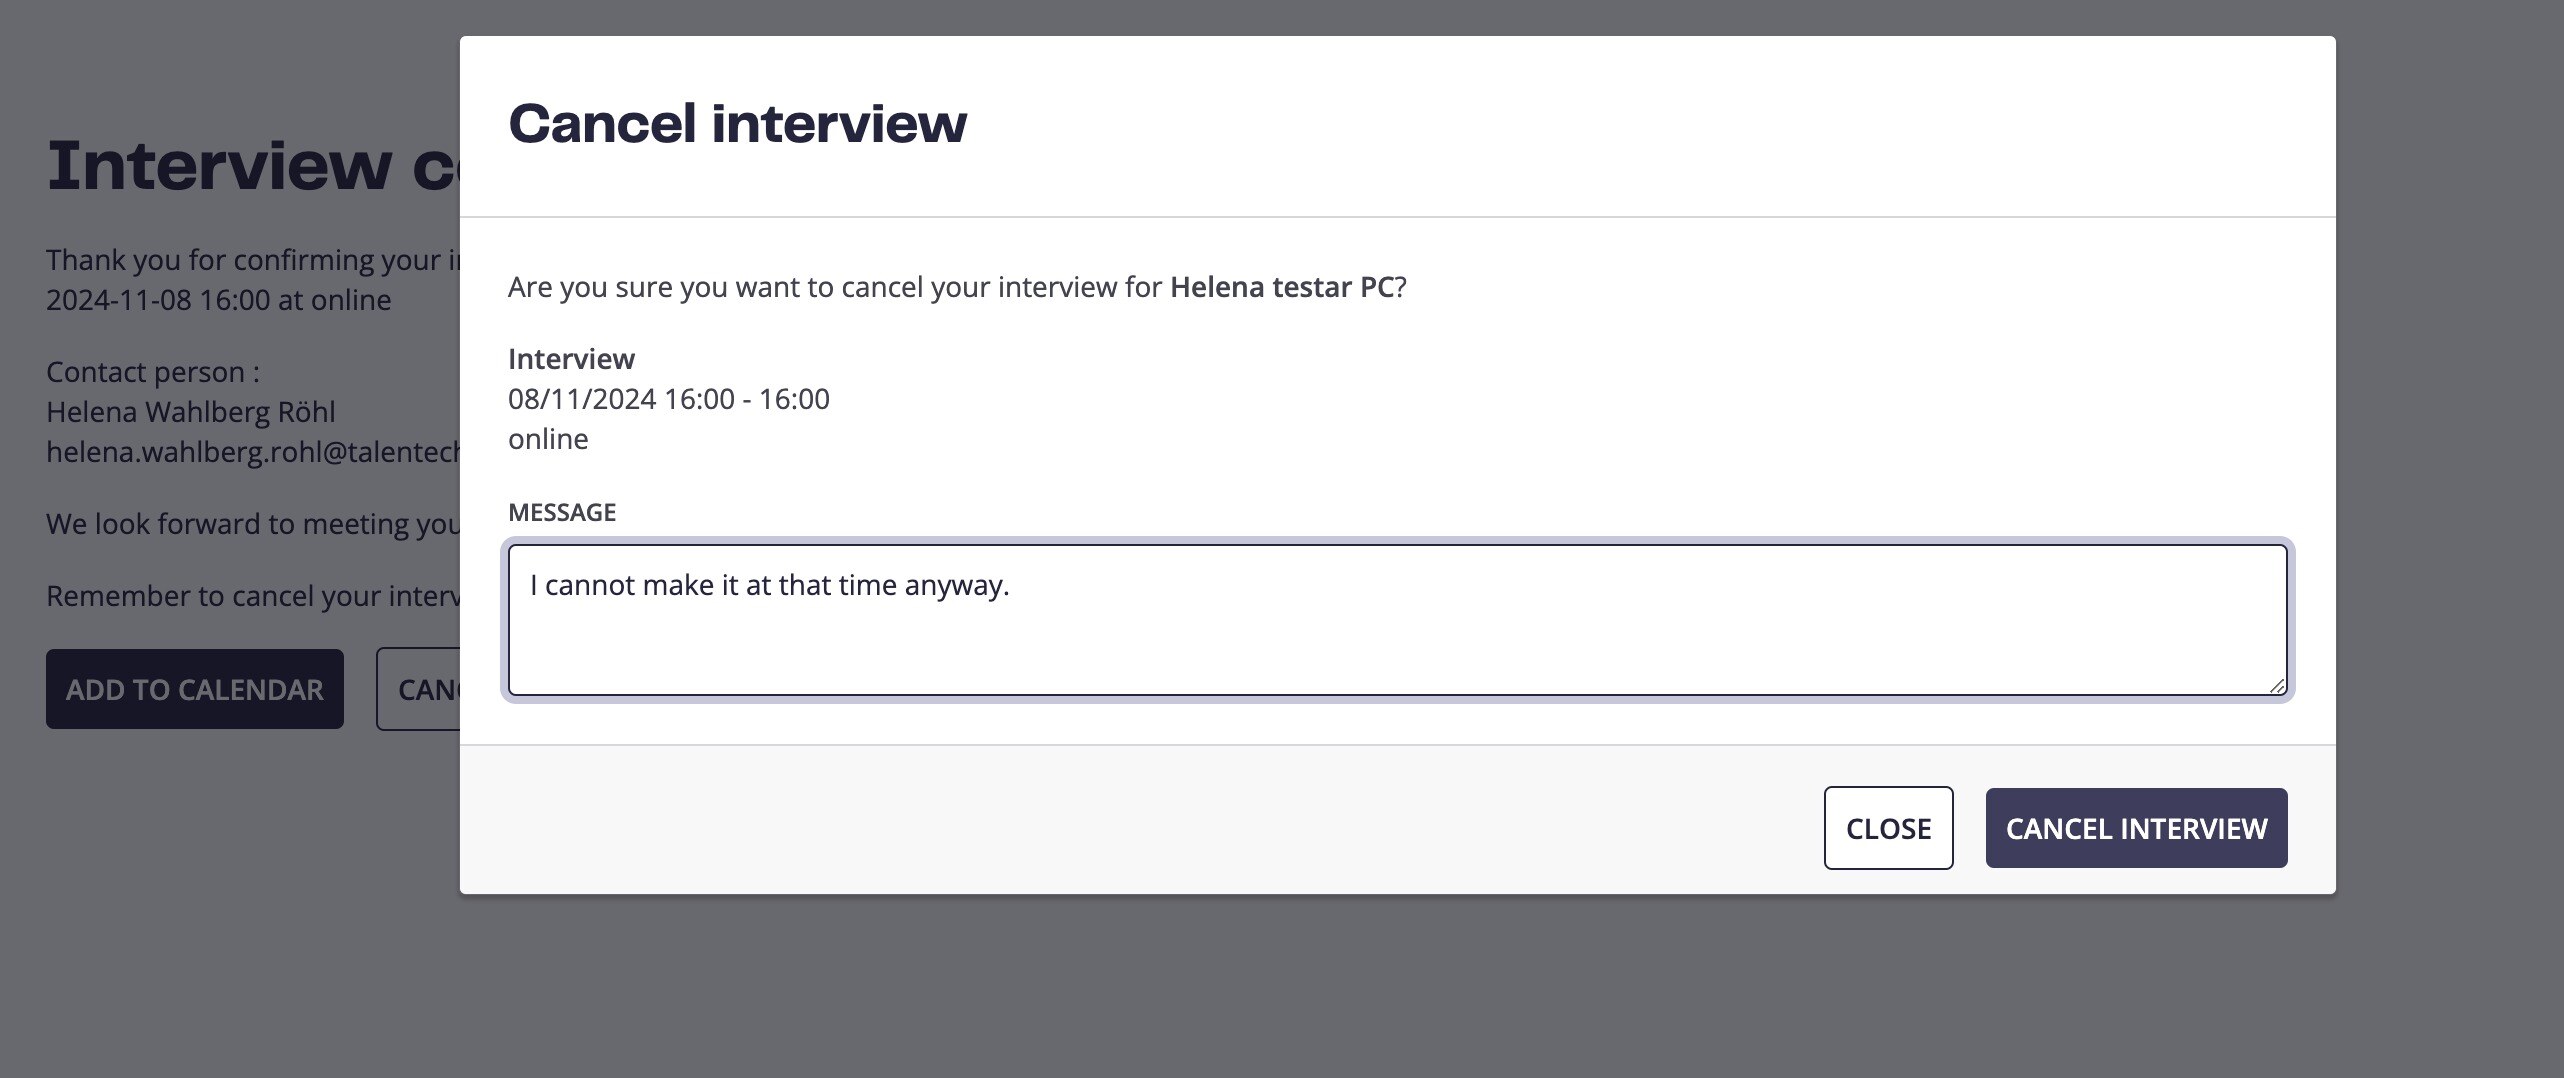
Candidates can also cancel the interview, if they cannot participate as expected.
When cancelling a meeting, candidates can give a comment to the cancellation to help recruiters understand what to do next:
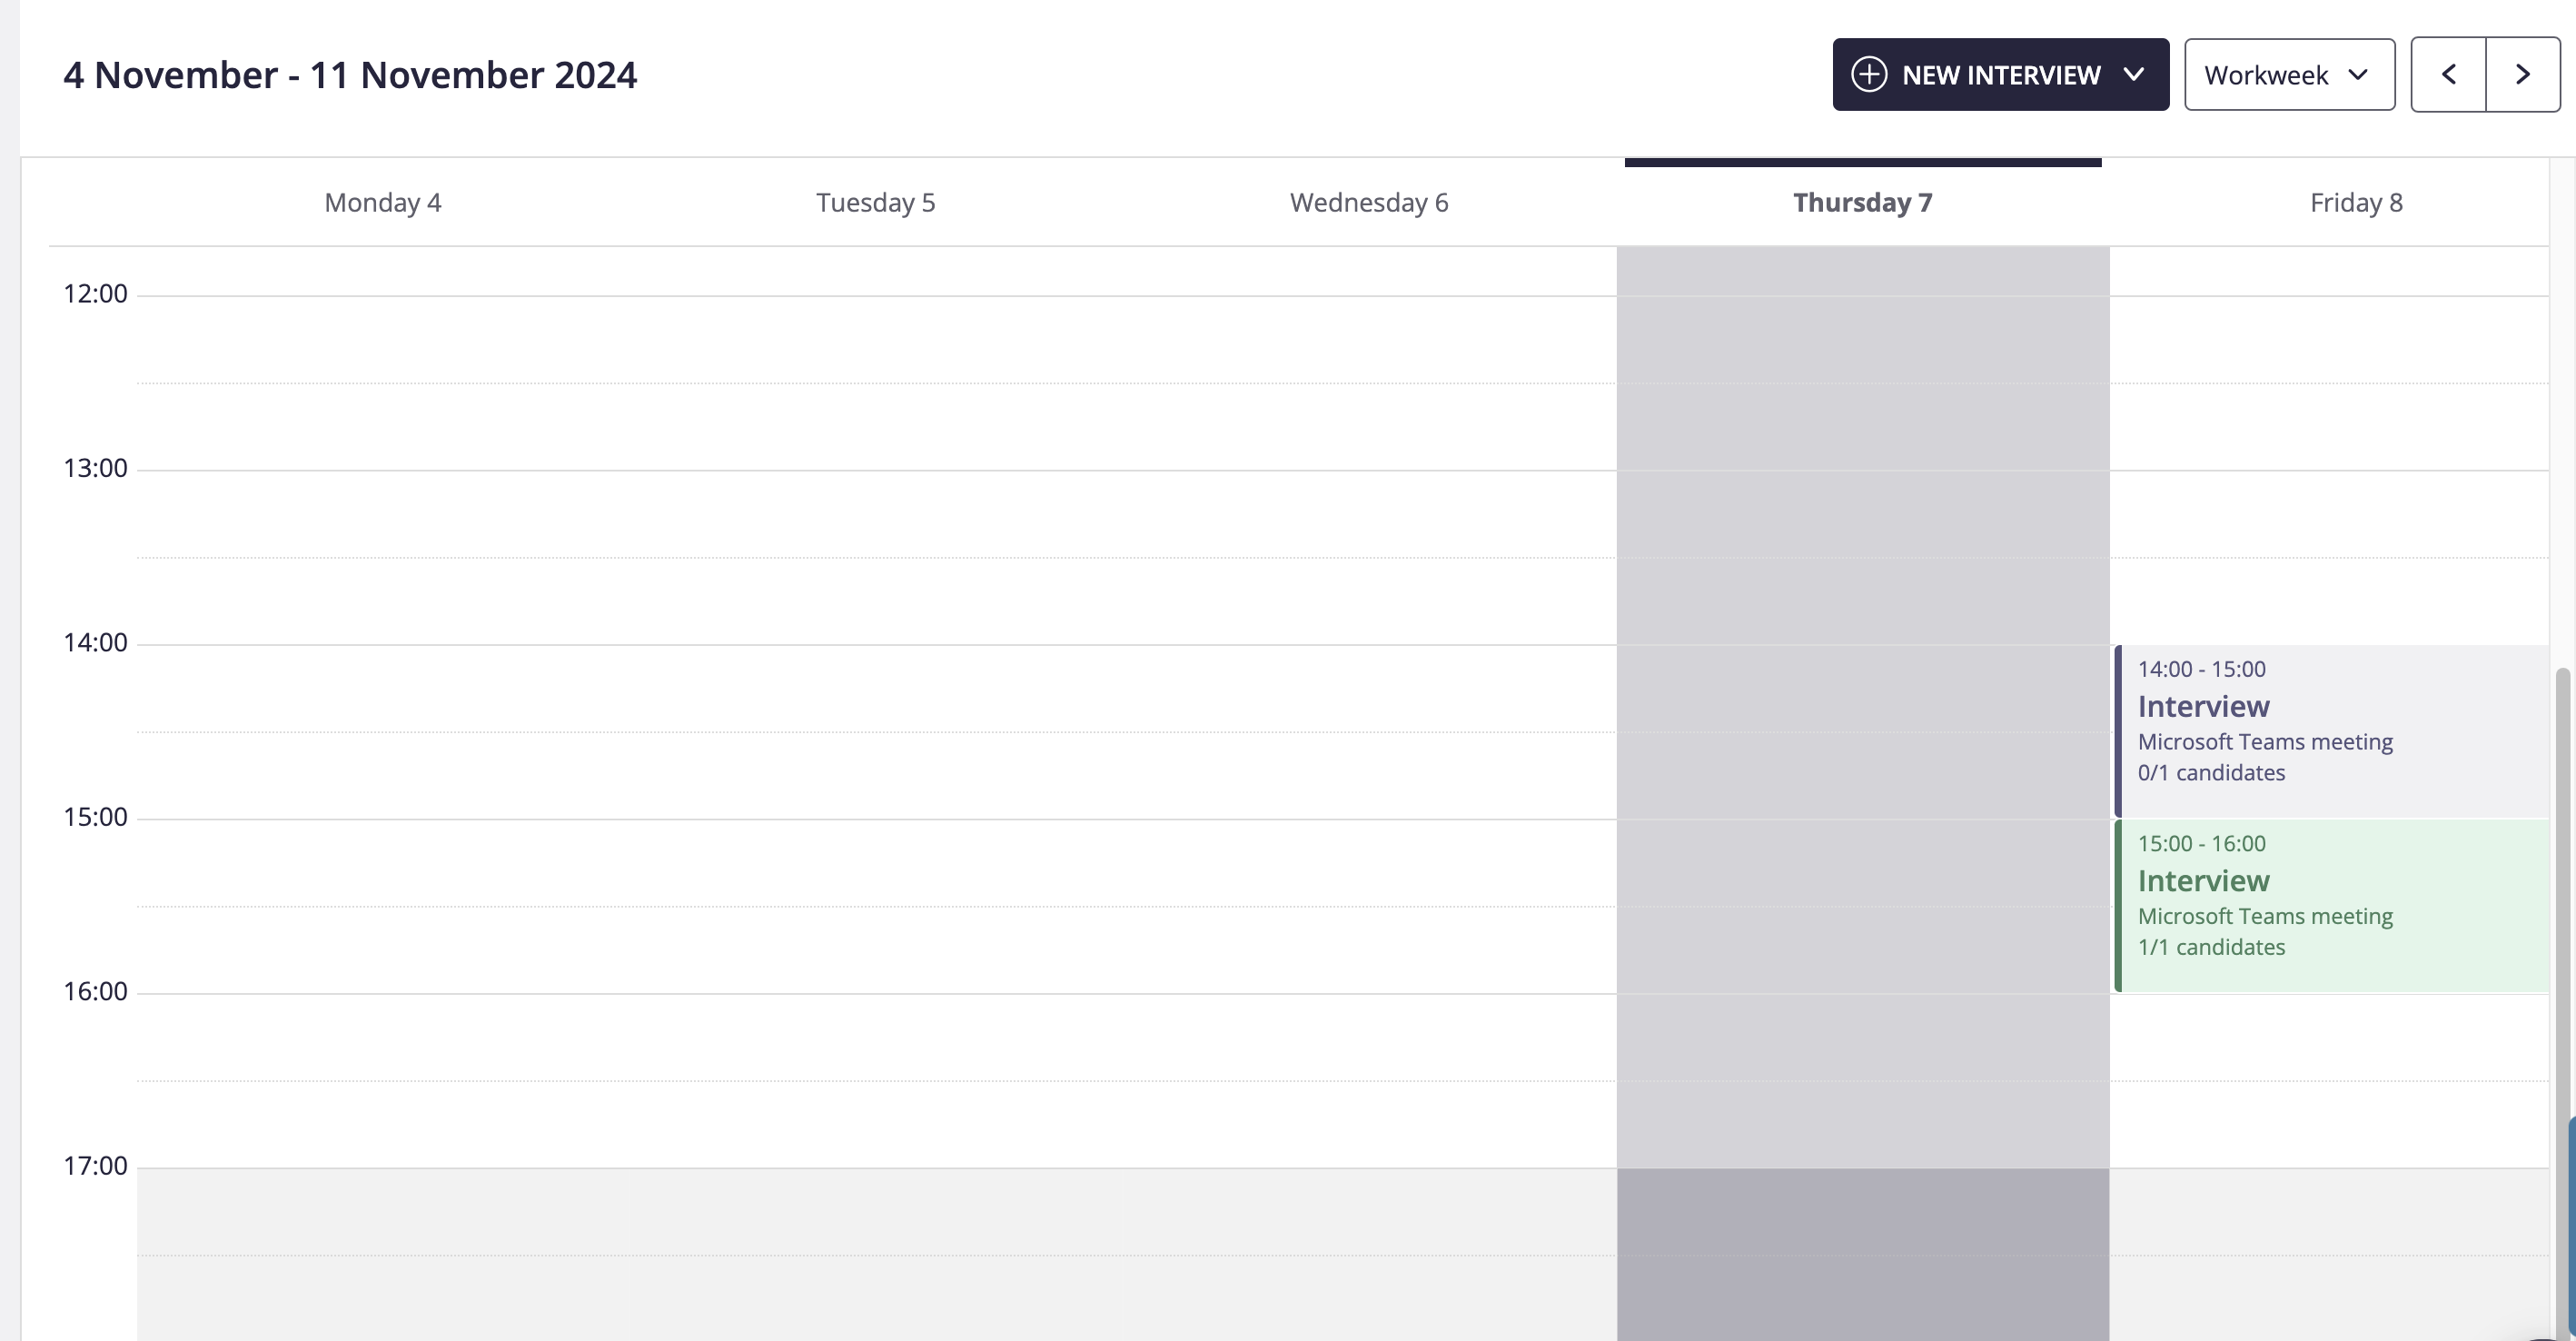
Viewing interview bookings
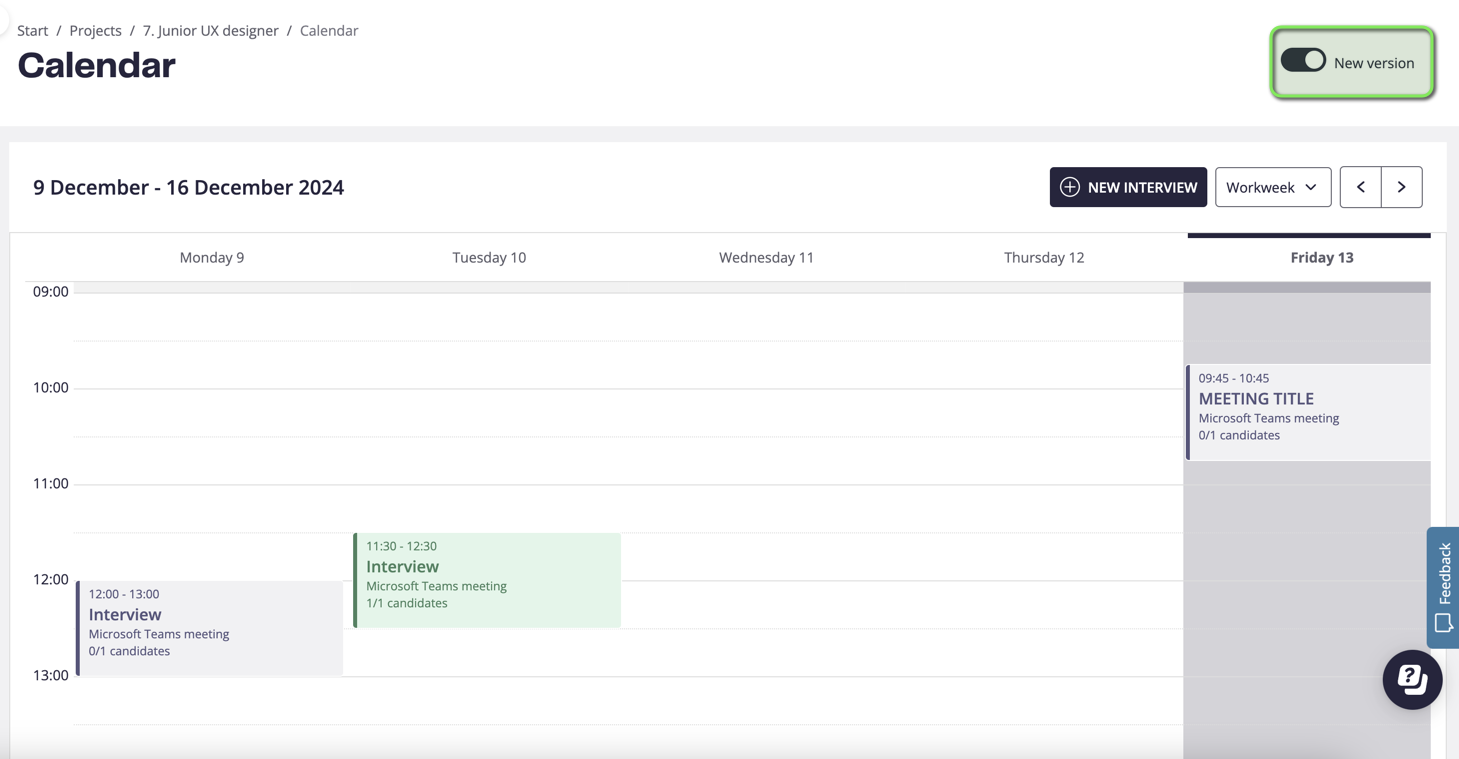
The overview of the recruitments interviews, can easily be found in the calendar view, where both booked and accepted can be viewed:
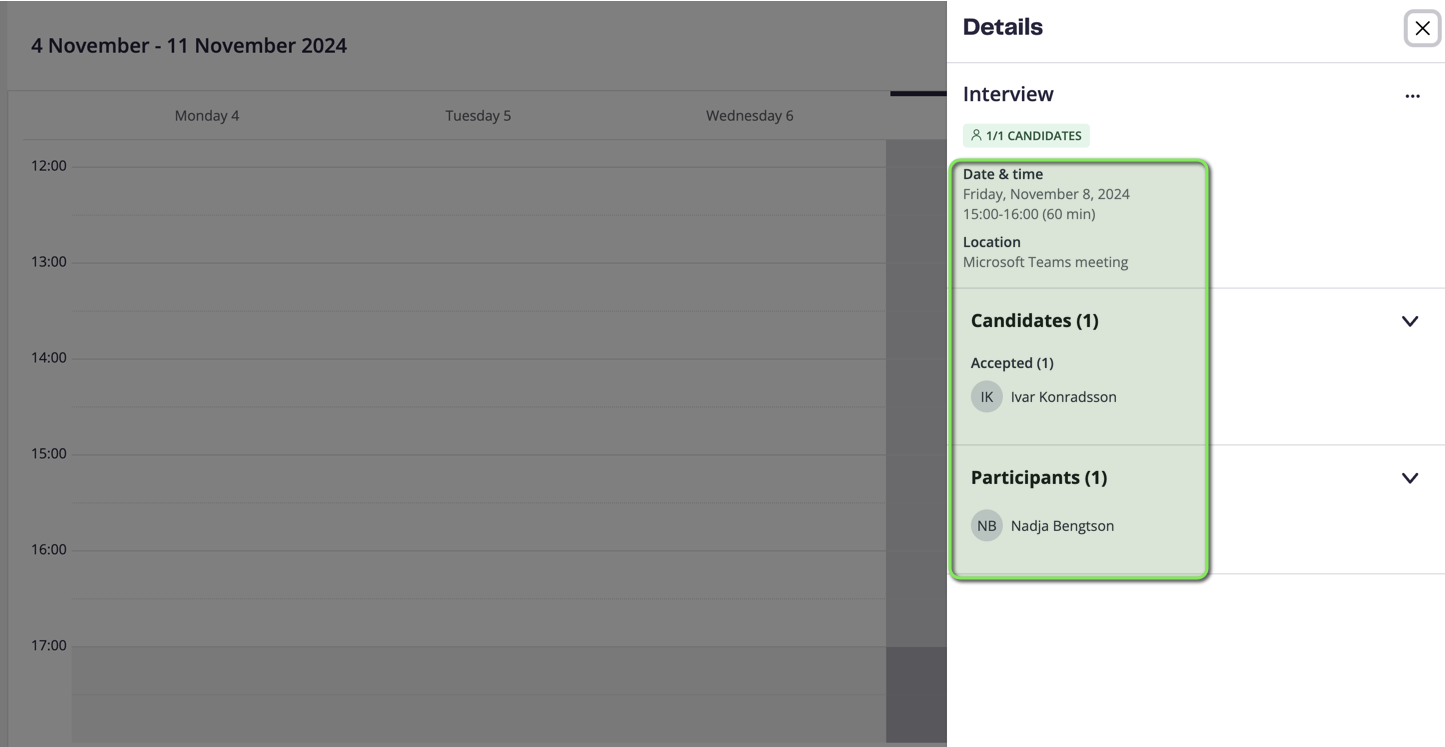
When clicking on the interview for an accepted meeting, you can view all the important details such as when, where and who will be joining:
Interviews that haven’t been selected yet, shows like this:
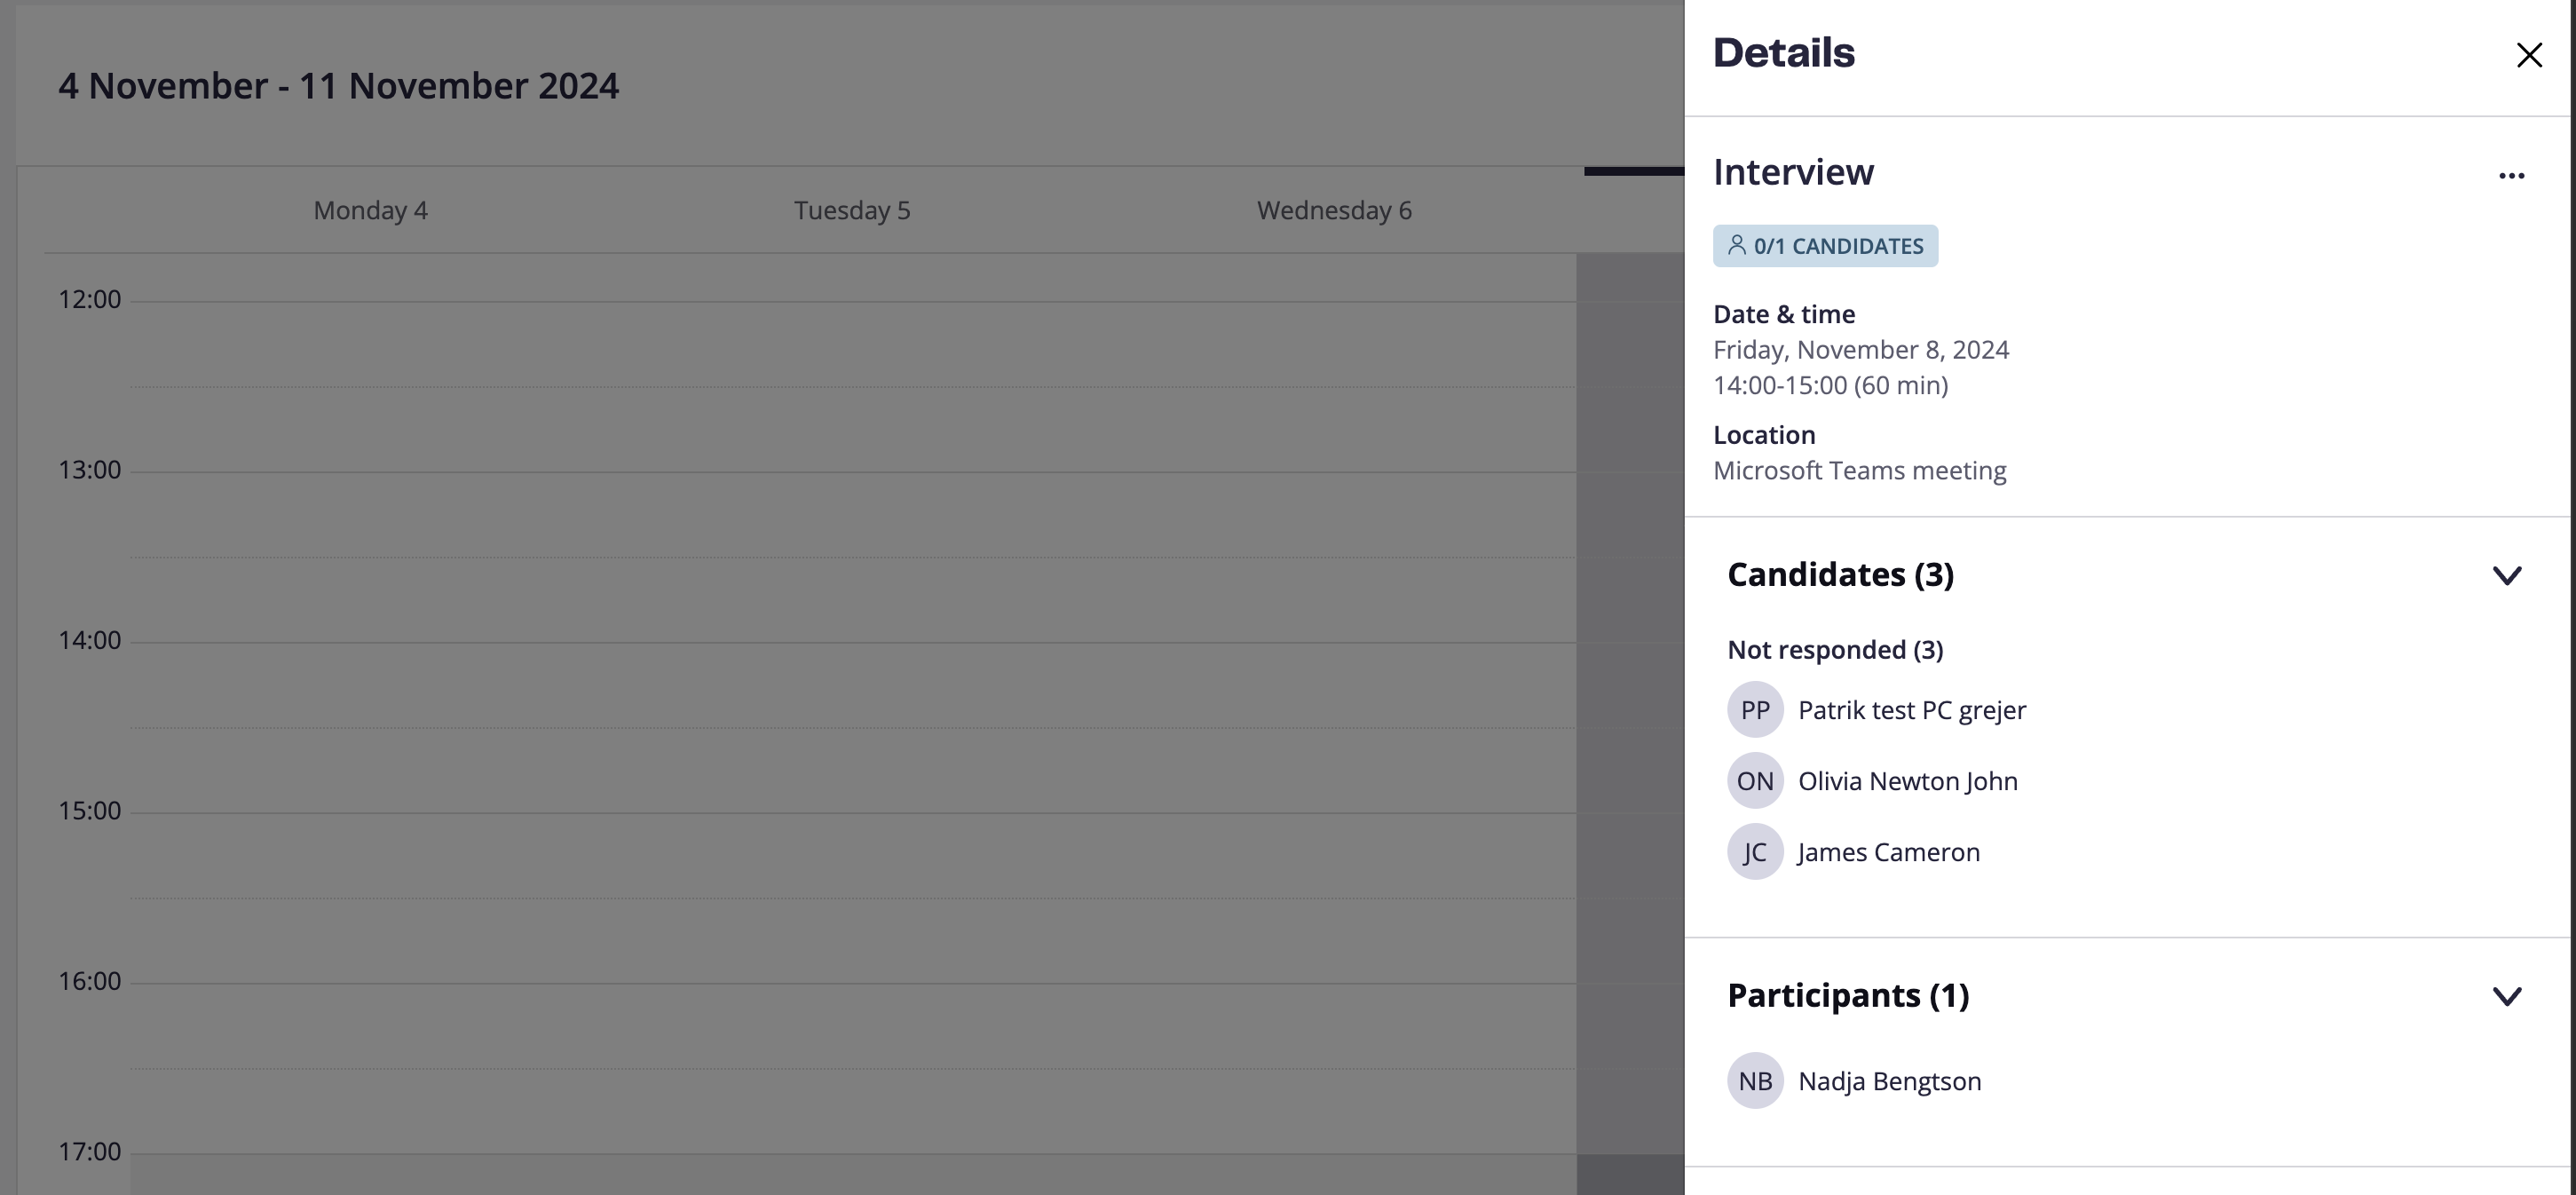
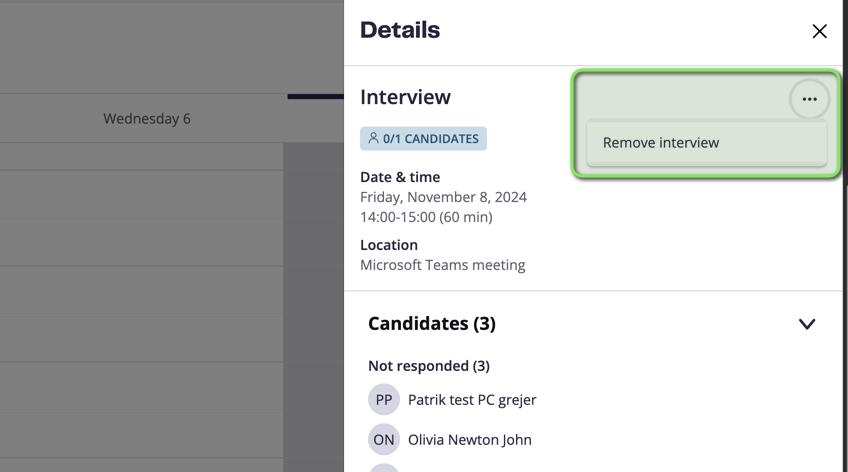
And if needed to remove a timeslot, you can easily do it directly here:
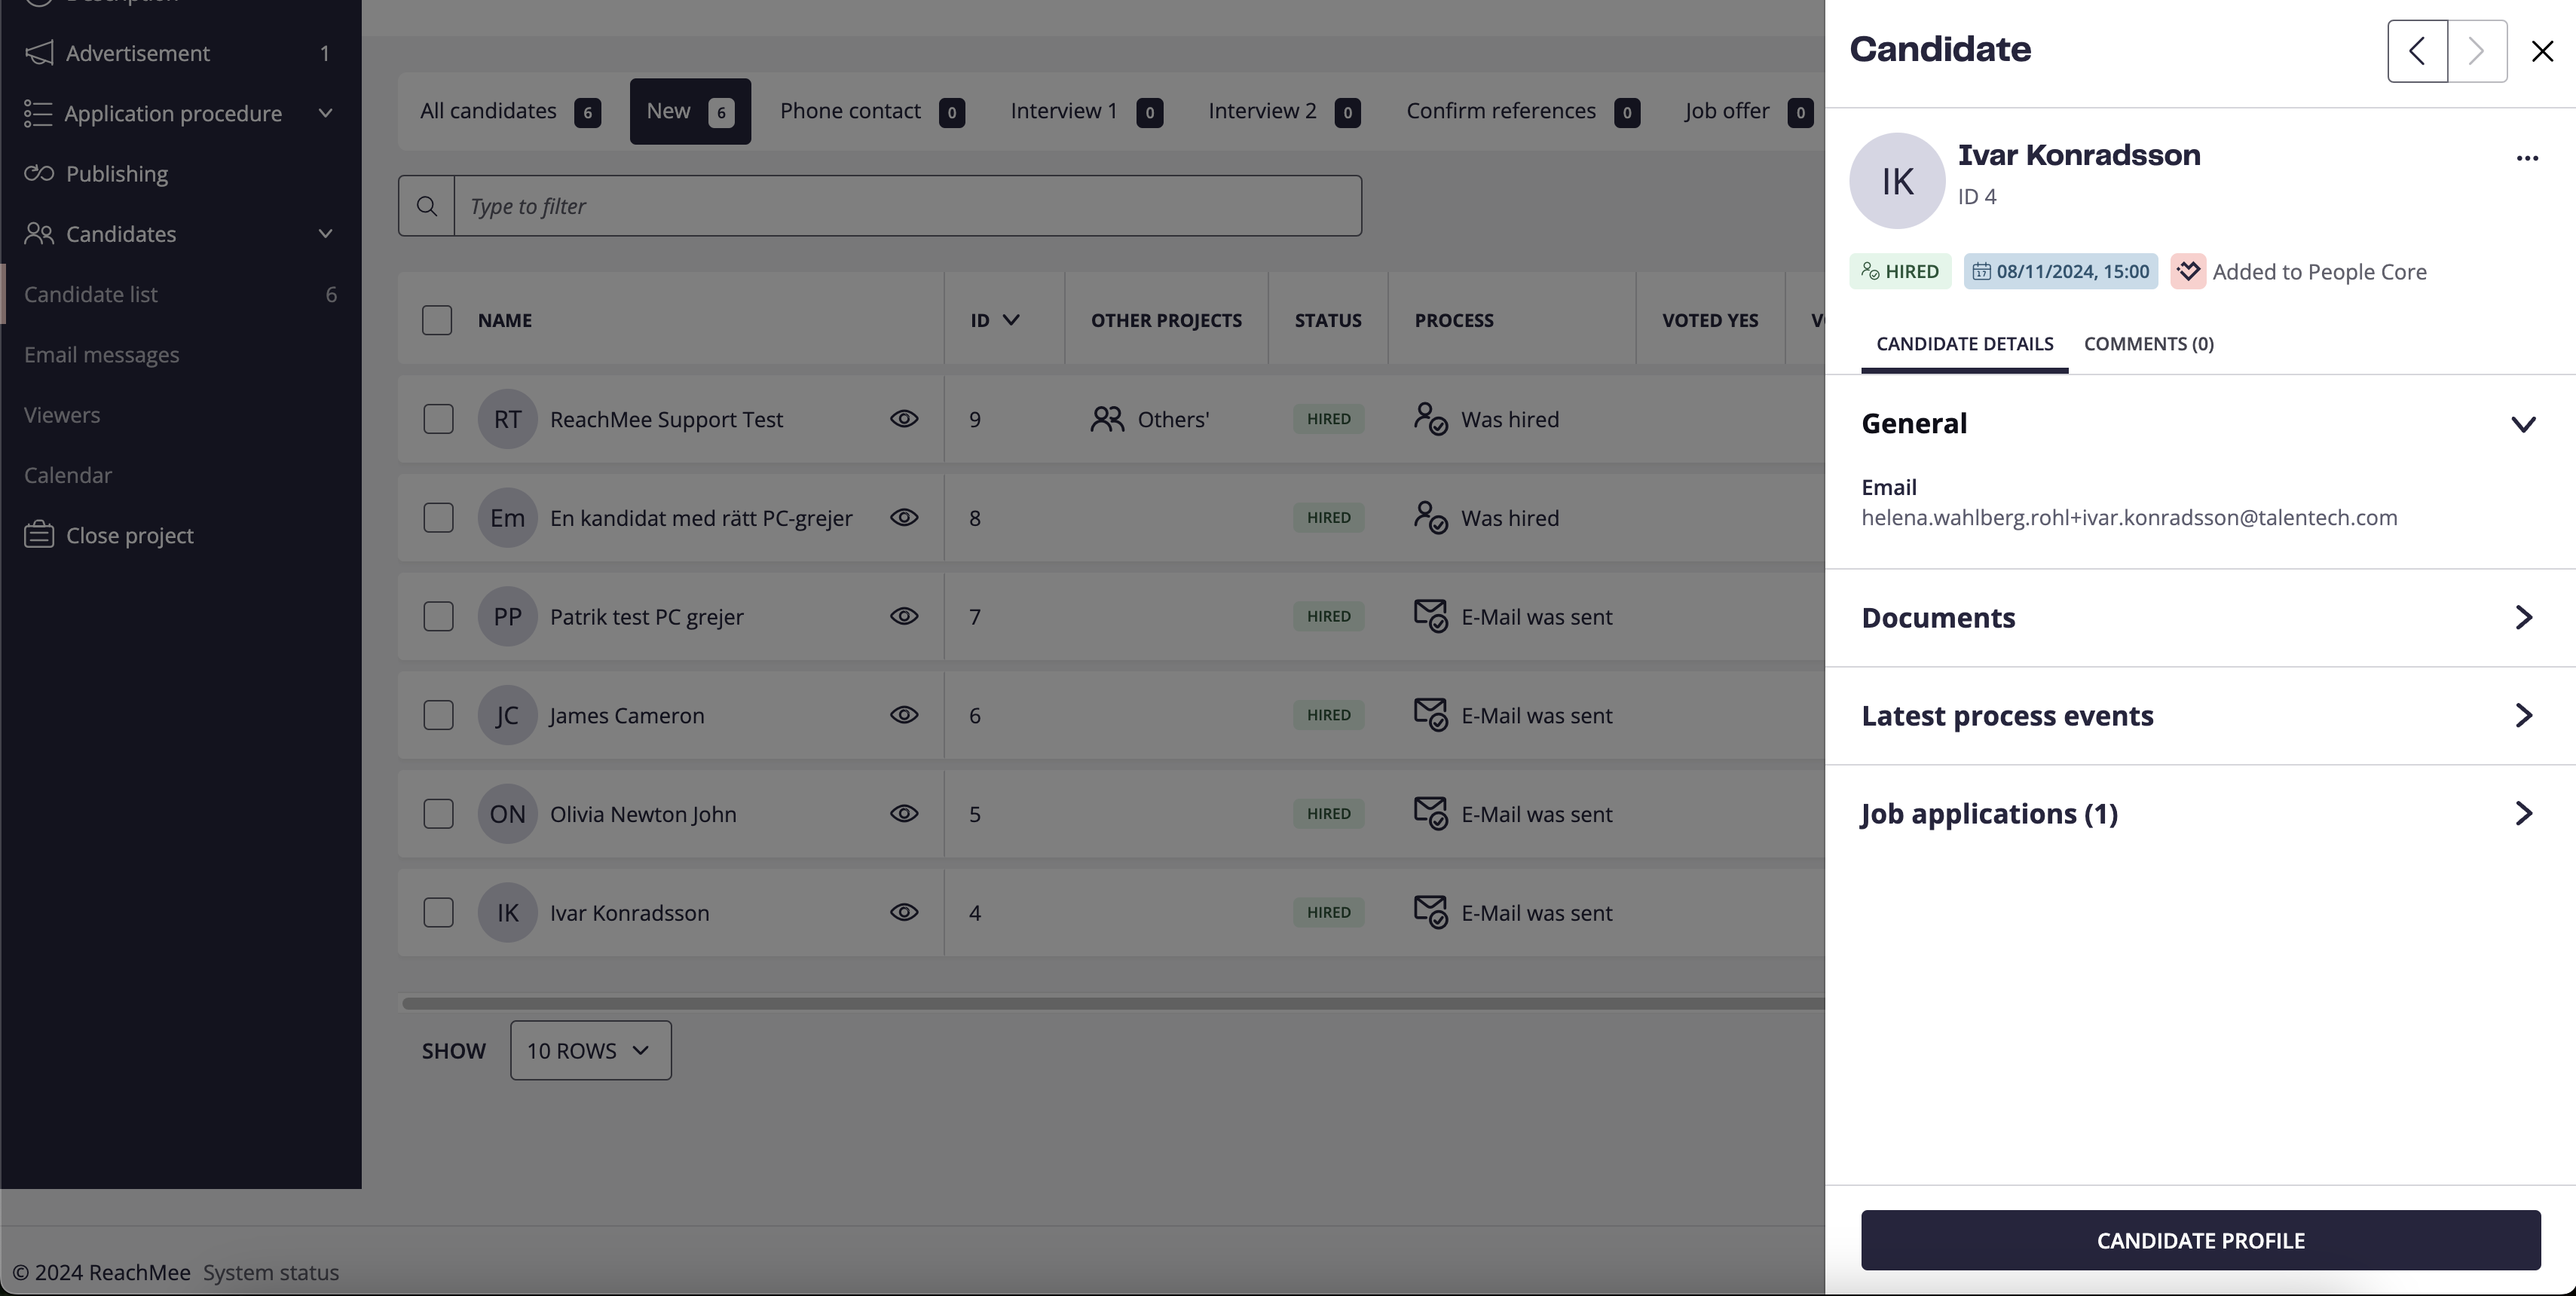
Accepted interviews can also be found on the candidate canvas, where you can click on the meeting to enter the overall view:
New/Previous version
During the time that it's possible to try it out, before we converted everyone to the new function, you can switch between new and previous version here:

Ready to get started?
Log in to your Talentech ATS to access the features